Friday, September 30, 2011

SFV (Simple File Verification) Ninja


I've came across an awesome tool today . I really need this. I thought it might be useful for you guys too. Coming to the concept, Many download portals and websites display file checksums on their download pages. The idea behind this is to give users the chance to calculate the checksum of the downloaded file to compare it with the checksum on the website. If the values are identical, then the file has not been tampered with (unless a hacker managed to alter the checksum on the page as well).
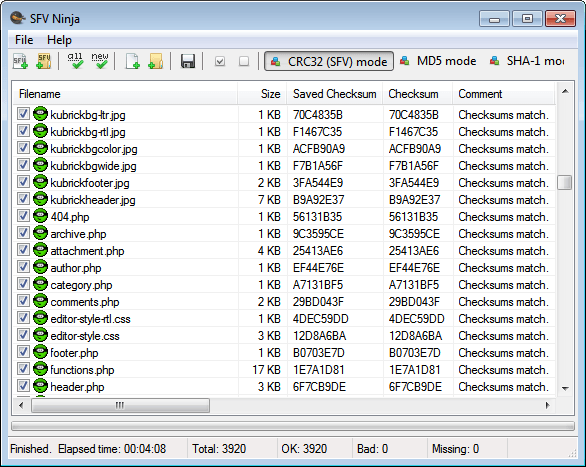
SFV Ninja is a portable software for Windows that can be used to calculate and display checksums of files that are accessible on the system. When you first start the program you have options to load individual files or files of a folder into the application. Users who have already worked with the program before can alternatively load a single checksum file or make the application crawl a folder for multiple checksum files to re-verify the data.

You can verify all files right away with a click on the Verify all files button. You may alternatively switch from the default CRC32 mode to MD5 or Sha-1 mode if those are preferred.
sfv ninja simple file verification


SFV Ninja is a portable software that is compatible with all recent 32-bit and 64-bit editions of the Microsoft Windows operating system. You  can download the latest version from the developer’s website.


If you enjoyed this post, make sure you subscribe to my RSS feed! Comments are encouraged

iScanner :Tool to detect and remove malicious codes and web page

iScanner is a free open source tool lets you detect and remove malicious codes and web page malwares from your website easily and automatically. iScanner will not only show you the infected files in your server but it's also able to clean these files by removing the malware code ONLY from the infected files.

Current Features:


  • Ability to scan one file, directory or remote web page / website.
  • Detect and remove website malwares and malicious code in web pages. This include hidden iframe tags, javascript, vbscript, activex objects, suspicious PHP codes and some known malwares.
  • Extensive log shows the infected files and the malicious code.
  • Support for sending email reports.
  • Ability to clean the infected web pages automatically.
  • Easy backup and restore system for the infected files.
  • Simple and editable signature based database.
  • You can easily send malicious file to iScanner developers for analyzes.
  • Ability to update the database and the program easily from iScanner's server.
  • Very flexible options and easy to use.
  • Fast scanner with great performance.
  • Yes, it's FREE!!


[via] If you enjoyed this post, make sure you subscribe to my RSS feed! Comments are encouraged

Thursday, September 29, 2011

SnapInstall: Mouse Triggered Screenshot Tool To Create Product Manuals


Dear readers, here is a new tool named SnapInstall.

This is used for taking screen shots. We usually use the print screen button on the keyboard or use some combinations of ctrl , alt etc,. But this is controllable even with the mouse. You can use middle mpuse button or scroll bar to take screen shots. The tool automatically saves the images and adds them all to a single PDF file to create a manual or installation instruction. For those needing to outline an installation procedure, taking periodic screenshots fast is more important. Run the tool, start off by entering a name for your procedural document, the name of the author and a logo if you like. One more convenient option is you do not have to tweak any key/ mouse button settings, the tool will take a full screenshot of whatever area you click on your screen and save it automatically when you click the middle mouse button.

After taking screen shots, right-click the icon in the system tray and select Create PDF And Exit.This will add all screenshots to a single PDF file. The PDF file captions each screenshot with its name and which application it is running in, and where you clicked to take the screenshot. This makes it easier for anyone reading the file to understand the process you’re explaining.

The screenshots are taken unobtrusively, only a notification in the taskbar appears and you can immediately move on to the next shot without having to stop and save the previous one first.


If you enjoyed this post, make sure you subscribe to my RSS feed! Commebnts ar4 encouraged.

WebCookiesSniffer : Capture cookies in real time

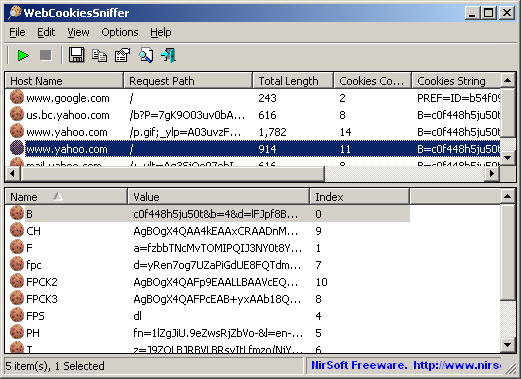
WebCookiesSniffer is a packet sniffer tool that captures all Web site cookies sent between the Web browser and the Web server and displays them in a simple cookies table. The upper pane of WebCookiesSniffer displays the cookie string and the Web site/host name that sent or received this cookie. When selecting a cookie string in the upper pane, WebCookiesSniffer parses the cookie string and displays the cookies as name-value format in the lower pane.


Requirements:

1) WinPcap : an open source capture driver that allows you to capture network packets on any version of Windows.
2) Microsoft Network Monitor Driver version 2.x (Only for Windows 2000/XP/2003): Download
3) Microsoft Network Monitor (3.x) (For Windows 7 ) : Download

Limitations :

Cannot capture files of a secured Web site (HTTPS)
 32 bit               --             64 bit              


If you enjoyed this post, make sure you subscribe to my RSS feed! Comments are encouraged. 

Wednesday, September 28, 2011

Browser Speed Tests: Firefox 7, Chrome 14, Internet Explorer 9

This article is short and sweet (may be hot for some). According to LifeHacker, the following is browser analysis.

Cold Boot-Up—Winner: Opera!

Tab Loading—Winner: Opera!

JavaScript—Winner: Chrome!

DOM/CSS—Winner: Opera!

Memory Use (No Extensions)—Winners: Opera and Firefox!

Memory Use (Five Extensions)—Winners: Opera and Firefox!

Overall Scores

  1. Opera 11.51: 82%
  2. Firefox 7: 73%
  3. Internet Explorer 9: 47.5%
  4. Chrome 14: 43%


If you enjoyed this post, make sure you subscribe to my RSS feed! Comments are encouraged.

Tuesday, September 20, 2011

BMW virus | High risk to BIOS

A BIOS based Virus discovered by a Chinese Security Firm. This is named as Mebromi. The virus that infected a chain BIOS (motherboard chip program), MBR (master boot drive) and Windows system files, reinstall the system, regardless of the victim computer, format the hard disk, or replace the hard disk can not completely remove the virus.


Phenomenon or symptoms of virus move :
1) Before the start screen of the computer , "Find it OK!" Words.
2) Anti-virus software prompting that  "Hard disk boot sector virus" is not completely clear.
3) The browser home page was altered to http://10554.new93.com/index.htm

How to fight against it?
The firm which discovered this also found a solution. Solution is named as "BMW virus Zhuanshagongju" . It can be downloaded from the following link.
This can detect the virus and prevent the virus code is written back to MBR, and then with 360 first aid kit to repair the system, can effectively prevent Such recurrent virus. Share this post and make your friends aware of this.


Note : This cannot effect Award BIOS.


[via]
If you enjoyed this post, make sure you subscribe to my RSS feed! Comments are encouraged. !

Sunday, September 18, 2011

Reduce size of an Image without reducing quality

Many times we could have faced a problem of size with larger images. If we decrease the size using some tools, the quality goes down to a great extent. But here is something different which made me to blog here. Here is a tool named JPEGmini . It a great tool which decreases the size by more than 2 times. Check it out.


If you enjoyed this post, make sure you subscribe to my RSS feed! Comments are encouraged. :)

How to increase data transfer rate into USB pen-drive in windows 7


  1. Click Start, type regedit in the Start Search box, and then press Enter.
  2. Locate and then click the following registry subkey: 
  3. HKEY_LOCAL_MACHINES\SYSTEM\CurrentControlSet\Control\usbstor\054C00C1
  4. Click Edit, point to New, and then click DWORDValue.
  5. Type MaximumTransferLength, and then press Enter.
  6. Click Edit, and then click Modify.
  7. In the Value data box, type a value to specify the maximum transfer size between 64KB and 2MB. For example, you select Decimal and type a value between 65535 (64K) and 2097120 (2M).
  8. Exit Registry Editor.
Restart the computer and changes are made now! Try connecting USB Pendrive or something and you will notice changes immediately when transferring file.


via. If you enjoyed this post, make sure you subscribe to my RSS feed! Comments are encouraged

Uninstall almost any Antivirus, Antispyware or Firewall Software

I got messed up with someof the Antivirus tools/softwares in my Windows many times. The problem with them is uninstallation. This may happen due to expiry or due to some corrupt files. If the virus corrupts the antivirus files itself, then this is the worst case. The reason may be anything. But the problem persists. What I used to do is just the Registry editing. I problem may be solved. but it takes much time. Atlast I've found a good solution on Blogsolute. There is a tool named AV Uninstall Tools Pack which can uninstall almost more than 30 antivirus. No need to edit Registry anymore. :)


It supports a almost all known Antivirus, Antispyware, Spam Fighters and Firewall.
It is a portable program offering a Single Window GUI for all Antivirus Program. You just have to select the Antivirus you wish to uninstall and Cleaner utility will be executed to begin uninstalling operation.


Here is a list of Antivirus Software that can be uninstalled.
avast! Antivirus Removal Tool 6.0.0.0
AVG IDP Uninstaller 3.5.0.0
AVG Remover (x32) 10.0.0.1322
AVG Remover (x64) 10.0.0.1322
Avira RegistryCleaner 7.0.0.12
BitDefender Uninstall Tool 1.0.14.5
BullGuard Uninstaller (x32) 1.42.0.0
BullGuard Uninstaller (x64) 1.39.0.0
CA Anti-Spam 2007/2008 uninstall Utility
CA Anti-Spyware 2007/2008 Uninstall Utility
CA Anti-Virus Uninstall Utility
CA Desktop DNA Migrator Uninstall Utility
CA EISS 2007/2008 Removal Utility
CA Personal Firewall Uninstall Utility
CA Website Inspector uninstall Utility
Comodo Products Uninstaller Tool 0.3b
Dr.Web Remover 2.0.0.7220
eScan Removal Tool 1.0.0.18
ESET Uninstaller 4.0.15.5
F-PROT Version 3.x Remover 1.0.0.475
F-PROT Version 6.x Remover 1.0.5.1
F-Secure Uninstallation Tool 3.0.890
G Data AntiVirus Cleaner 1.9.0.1
K7 Security Product Removal Tool 1.0.0.30
KAV Removal Tool 1.0.179.0
Max AntiVirus Uninstaller (x32) v1.0.0.1
Max AntiVirus Uninstaller (x64) v1.0.0.1
Max SpywareDetector Uninstaller (x32) 1.0.0.1
Max SpywareDetector Uninstaller (x64) 1.0.0.1
MBAM Cleanup Utility 1.50.1.3
McAfee Cleanup Tool (McAfee Consumer Product Removal) 5.0.285.0
Microsoft Security Essentials 1.0 Uninstaller (Microsoft Fix it 50535) 2.1.3.16
Microsoft Security Essentials 2 Uninstaller (Microsoft Fix it 50692) 2.1.3.4
Norman Uninstall (DelNVC5) 8.01
Norton Internet Security Removal 6.0.4.0
Norton Removal Tool 2012.0.0.19
Norton Removal Tool 2007.2.0.14
Norton Security Scan Removal Tool 1.0.0.13
nProtect Security Platform 2007 Remover 2.0.78.0 (090921)
Outpost Clean (x32) 7.1.3479.11508
Outpost Clean (x64) 7.1.3483.11513
Panda Cloud AV Uninstaller 1.6.0.0 Rev 7
Panda Uninstaller 2012 1.6.0.0 Rev 6
Panda Uninstaller 2007 1.5.0 Rev 1
PC Tools ThreatFire Removal 3.7.9.13
Prevx Removal Tool (for v1 and v2.0) 1.0.0.0
Prevx Removal Tool (for v3.0) 1.0.0.0 (2009.05.02)
QuickHeal 9.50 Removal Tool 1.0.0.1
QuickHeal 10.0 Removal Tool (2004.10.02)
QuickHeal 11.0 Removal Tool (x32) (2010.01.18)
QuickHeal 11.0 Removal Tool (x64) (2010.01.18)
QuickHeal Admin Console 4.2 Removal Tool (2009.12.01)
Radialpoint Security Uninstall Utility 9.0.0.41286
SPAMfighter Remove 6.0.0.0
Sunbelt CounterSpy Cleaner 1.0.3509.25408
Sunbelt Personal Firewall Cleaner 2.0
SUPERAntiSpyware Application UnInstaller (x32) 1.0.0.1018
SUPERAntiSpyware Application UnInstaller (x64) 1.0.0.1004
Symantec ActiveDataInfo ActiveX Control Removal Tool 1.0.1.0
Trend Micro Diagnostic Toolkit (x32) 17.50.0.1366
Trend Micro Diagnostic Toolkit (x64) 17.50.0.1366
Trend Micro Titanium 2 Support Tool (x32) 2.20.0.1126
Trend Micro Titanium 2 Support Tool (x64) 2.20.0.1126
Trend Micro Titanium 3 Support Tool (x32) 3.0.0.1303
Trend Micro Titanium 3 Support Tool (x64) 3.0.0.1303
Trend Micro WFBS Agent Removal Tool 7.0.1358
Vexira Uninstall (26.04.2010)
Vipre Premium Cleaner 1.0.3848.28197
VirusBuster Clean 3.5.3389.11926
Webroot Desktop Firewall Removal Utility 5.8.0.25
Webroot Spy Sweeper Consumer Cleanup Tool 2.0.1.492
Webroot Upgrade and Uninstall Utility 7.0.11.22
Windows Installer Clean Up Utility 3
Windows Live OneCare Cleanup Tool 6.1.22.0
Zondex Guard EraseAv 5.4.4.1
ZoneAlarm Removal Tool 10.0.246.0


If you enjoyed this post, make sure you subscribe to my RSS feed! Comments are encouraged. :)
Make your CD/DVD copy restricted

We need four softwares to this work perfectly.
1. Nero (http://www.nero.com/ena/)
2. Clone CD (http://www.slysoft.com/en/clonecd.html)
3. CD Secure (http://www.gold-software.com/CDSecure-file9707.html)
4. WTM CD Protect (http://www.webtoolmaster.com/)

Install all the above four firstly.

1. Grouping data that will burn in a CD in a single folder for easy.

2. Then copy 2-3 error image file that is owned by WTM CD Protect. The file is located in the folder Image-imp who are on the folder where you install this software, usually at C:\Program Files\WTM CD Protect\Imp-Image\Image-Imp.

3. Select multiple files *. imp, for recommendations image5.imp file copy, and image7.imp image6.imp. It’s Image is higher the number, the higher the level of encryption, but the greater the required capacity.

4. After that, paste the file in the folder that contains the data that you want to burn earlier.

5. Then prepare 1 piece of blank CD, then insert the CD Writer, and open the CD Secure application and fill out the form that is convenient for you. The goal is to create an ISO file. After the ISO is successfully made, please open the ISO with the same software. Then choose the folder that contains the most important key file to be hidden so as not to be seen even in any way. After that save it back to ISO. And close this application.

6. Now open the application Nero to burn a CD ISO into vacancies earlier. Through Nero Burning Rom, select the menu Recorder-Burn Image. When finished burning, reinsert the CD, then open the application Clone CD.

7. The goal this time is to create the image file from the CD. Make the image of the CD with Clone CD.

8. Open the application WTM CD Protect, and go into the Options menu to select the level of encryption, select the appropriate image file that you copied earlier error. Suppose you'd just copy the file image5.imp then in the menu option you can only select a level 5.

9. Then save option, move to the Image File menu. Select the image file that was created from Clone CD before, and then click Protect menu.

10. After work, remove the existing CD contents earlier, replace the CD vacancies. Then move to the application Clone CD, select the menu Write Image To Disc. Select the image file that had been protected by the WTM.

11. Then burn the image with Clone CD.

12. If it is 100%, re-insert the second CD and try to existing data in it to copy to your hard disk or to copy CDs. You will know the results that the CD you can not be duplicated.

This method proved to be of any data protection: mp3, movies, data, images and so on in a CD or DVD.


via
If you enjoyed this post, make sure you subscribe to my RSS feed!

Saturday, September 17, 2011

Windows 8 installation failure on Virtual box


To install and run Windows 8 in Virtual environment, you need Hardware Virtualization Technology enabled which is hardware assisted and mainly depends on CPU / Processor of your Computer.
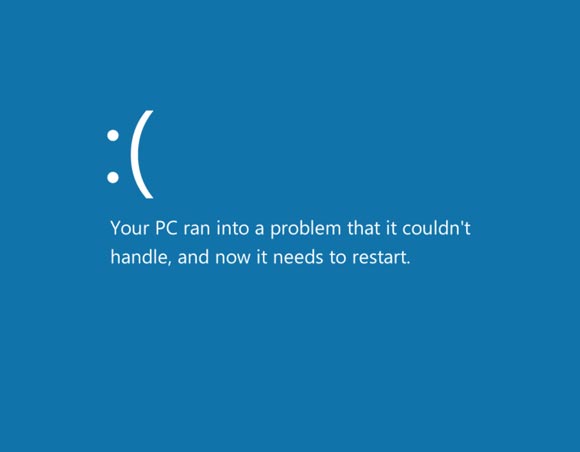
Though, Windows 8 setup starts but it crashes at later stage or VirtualBox throws critical error with Black Screen. Some users may also get Windows 8 Blue Screen of Death.

So, that is the main reason behind Why Windows 8 installation on Virtual machine or VirtualBox Failed. Either Hardware Virtualization is not enabled or not supported.

How to check whether Hardware Virtualization is supported?

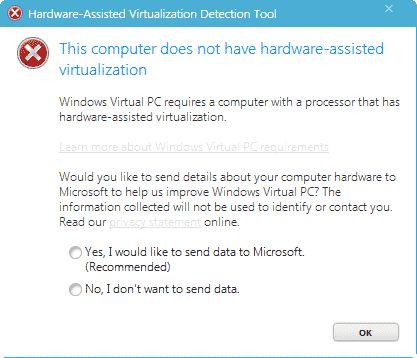
Download Microsoft Hardware-Assisted Virtualization Detection Tool and open it. If it says this computer does not have Hardware-Assisted Virtualization then either is disabled or not Supported.

Check Virtualization Supprt
If not supported, you have no choice than making a clean installation. But, there are chances that it may be disabled so, to check that- Reboot into BIOS setup and find Virtualization Support menu and Enable it.
After enabling, you are good to go and try installing Windows 8 virtually again and chances are that you will succeed.
Note that Instructions to turn on hardware virtualization in your PC BIOS are specific to OEM models. It is important that after changing your BIOS settings the PC is completely shut down at the power switch before restarting so that the new BIOS settings can take place.
Mentioned above can be one of the major reason but not the only one. It can fail if Machine doesn’t meet minimum requirements like 1GB RAM, 1GHz and 20GB Space.


via : Blogsolute
If you enjoyed this post, make sure you subscribe to my RSS feed!

Protect your privacy with TunnelVision: automatically block out parts of your screen where your mouse cursor is not

TunnelVision is a computer screen privacy tool for Windows. It is simple, lightweight, and open source application which blocks out your whole computer screen except a select area where you mouse cursor is currently located.


With TunnelVision you have the option of configuring how large area is visible, what shape the area is, and the color of the area which is blacked out (you may even add an image)

One thing you should be warned about: when you first run TunnelVision it will only show you a small area where your mouse cursor is (like my first screenshot above) so you will have to manually find your way to your system tray and change TunnelVision settings via the system tray icon.
Admittingly using TunnelVision may get annoying seeing as you yourself cannot see much of your computer screen. However if you think you have the need for blocking out parts of your screen... what is better than an open source application to do it with? You can download TunnelVision from the following link:

Features:
  • configurable viewport shape, size
  • configurable color
  • configurable background image (with tiling, scale, centered modes)
  • tiny program, low memory footprint (when no background image is used)
  • supports Windows 95 and later (though tested more extensively on 2000+)
  • lovely GPL license! 


If you enjoyed this post, make sure you subscribe to my RSS feed!

Automatic logon to Windows 8


Fortunately, similar in the pre-release version of Windows to Windows 7, 8 but very terms of the orders. So also in the automatic registration of the user account. Unless you have only one user account to offer this automatic notification. At least I use it in Windows 7 since its inception.
Just press once " WIN + R "and it opens the" Run box "(sometimes I just use the German words). In this box you are wearing now the simple statement " netplwiz "one.
Then open the user settings. Here you take it - as well as in Windows 7 - "User must enter username and password" on the hook out.
Click on " Apply "button and enter in the new window then the password for your account.
With OK to confirm and will be automatically logged off immediately.
Of course this also goes by the call entsprechden Apps. Just open a search page in the metro and then there " netplwiz enter ". And it will be listed on the left the appropriate app.


via : Beatmasters
If you enjoyed this post, make sure you subscribe to my RSS feed!

Wednesday, September 14, 2011

Facebook and Amazon are storing variant passwords

Yes. I mean it. The support for the title is as below.

Facebook is storing the users' passwords in 3 forms.I've tried this too. You can use any of these to login to your Facebook account. The forms are :

  1. Original password. (say "passWord123")
  2. First letter capitalized. ("PassWord123")
  3. Reverse of capitalization i.e changing the case for all the letters. ("PASSwORD123")
The second type is for Mobile devices. Third type is also used in order to facilitate the user taking the caps-lock key into consideration i.e even if your caps-lock is on, you can enter your Facebook account by entering your password normally. The question here is "Is this a bug?" My answer is "It doesn't matter" why beacuse, this is purely to facilitate the users. But coming to bruteforce attacks, this raises the vulnerability level to 3 times.

Now, coming to Amazon it uses similar concept but not completely like Facebook. 

This is the link for the article about this. I didn't try this yet. Please let me know through your valuable comments if anything is wrong.


If you enjoyed this post, make sure you subscribe to my RSS feed!

Monday, September 12, 2011

How to Convert Flash SWF to HTML 5 Files | Google Swiffy

Today, I came across a new Google service named Google Swiffy.


Swiffy converts Flash SWF files to HTML5, allowing you to reuse Flash content on devices without a Flash player (such as iPhones and iPads).
Swiffy currently supports a subset of SWF 8 and ActionScript 2.0, and the output works in all Webkit browsers such as Chrome and Mobile Safari. If possible, exporting your Flash animation as a SWF 5 file might give better results.

You can also preview the file on your mobile device right after loading the SWF file. The preview is saved for 15 minutes, which you can then implement in your website if you feel the final conversion is good enough. 


If you enjoyed this post, make sure you subscribe to my RSS feed!

How to control more than one system using single mouse | Microsoft's Mouse without Borders

Now we can control more than one computer with Windows operating system installed in them using a single mouse.

Mouse Without Borders is a project that allows you to reach across your PC's as if they were part of one single desktop.  We have two PCs on my desk at work connected to 3 LCD screens and using Mouse Without Borders we can move the mouse between the 3 screens, even though one of them is attached to a different PC from the other two. Also, we can move files between the 2 computers simply by dragging them from one desktop to another. In fact you can control up to four computers from a single mouse and keyboard with no extra hardware needed – it’s all software magic, developed by Truong Do who by day is a developed for Microsoft Dynamics. The software is easy to setup and in addition to enabling drag and drop of files, you can lock or log in to all PCs from one PC, and as a whimsical bonus is it allows you to customize your Windows logo screen with the daily image from Bing or a local collection of pictures. I've heard from one of my friends that using Ubuntu he connected more than one system and made each desktop as a work space. But here, completely controlling other system is the concept. Additional options include locking all PCs or logging in on all at once.


Mouse Without Boarders is a Microsoft Garage project, in which Microsoft employees come together after work to build and invent. The program can be downloaded from Microsoft’s Technet website.


If you enjoyed this post, make sure you subscribe to my RSS feed!

Sunday, September 11, 2011

Improve PC Security by Changing the RDP Port

To protect against bots and script kiddies, the RDP Port must be changed.When Remote Desktop is enabled, additional precautions must be taken to minimize the possibility of malware infection and hacking. If the tech at a software company can remotely operate your computer, then so can anybody else with the knowledge and ability.

The remote desktop protocol drives Remote Desktop Services through Port 3389 by default. Any Remote Desktop connections are made through Port 3389.So, by changing the RDP port, security is enhanced because bots and kiddies are designed to target RDP Port 3389.For this to be truly effective, implement a strong account lockout policy. This defends against the use of RDP protocol to obtain the administrator password. If the password is attainable due to the absence of an account lockout policy, then the RDP Port can be found regardless of what it has been changed to. Changing the default RDP port is achieved through a simple registry hack.


The Registry Hack

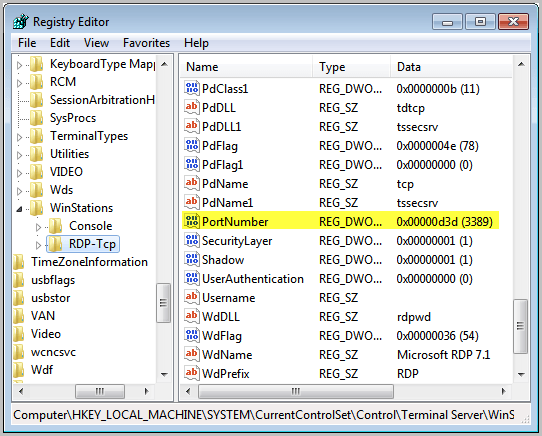
Run regedit from the start menu to open the Registry Editor. Navigate to HKEY_LOCAL_MACHINE, SYSTEM, CurrentControlSet, Control, Terminal Server, WinStations and RDP_Tcp. Find the PortNumber dword and right-click.
rdp port
Select Modify. Alter the base to Decimal and enter the new port number with a value between 1025 and 65535, as long as the port is not in use. Click OK.


The Software Hack

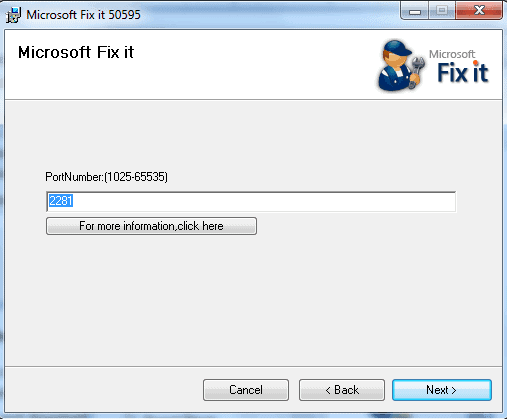
The Microsoft Fix It Wizard can be used to change the RDP Port. It is available through the Microsoft website. Here is the download link: http://go.microsoft.com/?linkid=9759545. Click this link and download the free utility. Click Next to initiate the Wizard. A PortNumber screen will be presented. Enter the value of an unused port that you want to use as the new RDP Port. Again, the value must be between 1025 and 65535. Click Next and you are done.
change rdp port
Reboot the system to put the changes into effect.
The next time you connect to your system with RDP you are going to have to provide the new port number. Be sure that you write it down in a safe place so you do not forget. From the Remote Desktop client, append a colon after the ip address or after the host name and enter the port number after the colon. This will set everything up to operate normally.

Enjoy!


via : Ghacks
If you enjoyed this post, make sure you subscribe to my RSS feed!

Saturday, September 10, 2011

Open a website in Text only mode

We can see many cases where the websites like Facebook etc., were blocked in several organisations. Also, when we open some websites containing useful information, there is a chance of adult ads. This may bring us down if parents were beside us. Many cases like these, we see everyday. The best alternative I found is text mode. If we open a website in completely text mode then no need to worry about annoying adult images.

 If we see this TextMirror , it gives us an option to enter a URL. It, then converts a webpage and returns us with a text mode. But the disadvantage I found is the hyperlinks are not working even. Except this issue, Textmirror works fine.

If you enjoyed this post, make sure you subscribe to my RSS feed!

What is the difference between Video format, codec and container ?

 The video format sets the rules, the codec interprets them and a container format is a meta format that bundles multiple files into one container.

Video Format : consists basically of a set of rules and parameters that define the video. This is the native resolution, color depth, the frames per second among other parameters. Video format examples are the DVD video format, the 3GP video format or 1080p and 1080i formats.

Codec : Interpreter for the video format or formats it supports. Devices and software use codecs to compress and decompress video.It is used by video players to determine how the video needs to be played correctly on the system.

Container : Bundles multiple files. For videos, this is usually the video and audio track. More advanced container formats can include other data types as well like menus for example. Popular container formats are avi, mkv or mov. Advantage of using a container for a video is that programs can use different codecs for the tracks of the video. It is therefor possible to use one codec for the video and one for the audio.

If you enjoyed this post, make sure you subscribe to my RSS feed! 

How to Run Portable Google Chrome from a USB Flash Drive


Download the Portable Google Chrome installer from this link:
http://stadt-bremerhaven.de/download-manager.php?id=250
   The installer is a 7zip extractor. To get Portable Google Chrome set up on a flash drive, click the “…” button and choose the flash drive. Click Extract.The “…” button is a browse button. You would click on Computer and then the appropriate drive. When the extraction is complete, you may use the portable version of Chrome right away. Browse your flash drive and double-click its icon. You will notice that the language is set to German by default. If you speak and read German, that is fantastic. On the other hand, you may not. Click the wrench button in the upper right corner of the screen and select Options. In this demonstration, only a few of the words are in German and everything else is in English. Usually, it is all in German. Select “Under the Hood” and under the Web Content section, click the “Languages and spell-checker settings” box.
You will see the language list and it may already have English (United States) as the default, but some content is still going to come up in German, so click Add at the bottom left of the screen and select the appropriate language.
Click OK. Your browsing history is saved to the flash drive.

Note : The overall speed is generally slower than the PC non-portable version.

via : Ghacks
If you enjoyed this post, make sure you subscribe to my RSS feed! 

Thursday, September 8, 2011

Fill out Captchas automatically


Sophisticated Download Managers are jDownloader and Mipony are used to download files from File hostings like Megaupload, Rapidshare, Fileserve, etc. But the you have to pass through annoying Captcha so, here is a plugin for these software to bypass Captchas or fill them automatically.


Captcha still remains problem because Instead of checking whether you are human, some actually does an eye test! and Moreover time is wasted on identifying and filling out.
Captcha Trader is most accurate captcha filling service which is based on Credit system.

How to install Captcha Trader Plugin

Create account on CaptchaTrader and after successfully verifying account, you get 100 Credits. 10 Credits are spent on cracking one captcha means only 10 captchas can be filled out for free.
To get more, you can earn credits by solving out captchas or buy credits which is cheap i.e 10000 credits for 6$.
Plugin is available for jDownloader, Mipony, PyLoad and FritzLoad and installation manual comes with the plugin package for respective program.
For jDownloader - Download plugin and unzip the contents into installation folder -
<JDownload Install Directory>\jd\captcha\methods
Open the file with Notepad captchatrader.properties and modify it this way:
username = your user name at CaptchaTrader
password = your password at CaptchaTrader
That’s it! Now start jdownloader , put in all the files you want to download and watch the “magic”. Time 12-13 seconds and even the most difficult captcha will be overcome by the program automatically without you having to lift a finger. Re-Enjoy!

via : Blogsolute

If you enjoyed this post, make sure you subscribe to my RSS feed! 

Solution for : Windows7 / Ubuntu 11.04 option missing from the boot menu


Today, I've done a mistake while installing my Ubuntu 11.04 alongside windows.
After selecting the partitions and assigning /boot, swap and / we need to choose where to install the grub boot loader. By default, the boot loader should be installed in the 1st partition of the first hard disk i.e., (hd0,0). I have windows7 already installed on my system. So, there is one more option named windows 7 loader. Due to lack of knowledge, I thought that default boot loader will be replaced by the new Grub loader and selected it. What happened is, I have both windows and ubuntu safely residing on different partitions of my hard disk. But not able to boot into windows7. In the Grub that appears at system startup, we need to choose an option named windows7 loader in order to get into windows box. But entering this option yielded with the result of same boot menu again and again. Then I understood my mistake. I have replaced the windows boot loader with the grub loader. This is my mistake. So, I entered my ubuntu, connected internet and then googled for the solution. After much work and many trails, I did the following procedure.

  1. Reboot and enter the option named "windows 7 recovery loader" which appears in the boot menu of grub. This takes you to a command prompt(windows).
  2. Type "bootrec /FixBoot" and press Enter
  3. If it doesn't work then type "bootrec /RebuildBcd" or
  4. "bootrec /FixMbr" (all commands without quotes).
  5. If it worked, no message will be displayed. But in case of error, the error message will be displayed.
  6. Try following the above order.
  7. Reboot. You will enter into Windows without asking for boot menu. Don't panic. Your ubuntu is still safe.
  8. Now put your ubuntu CD and delete the partitions given for /boot,swap,/ . 
  9. Make them again as usual and reinstall the ubuntu without touching bootloader installation area. (Leave it as it is. It gets installed into /dev/sda. And reinstalling doesn't delete your files in ubuntu).
  10. After installtion, you will be back with your bookmarks, personal folders etc,.
  11. Reboot to check for dual boot menu.
  12. Now, grub is same as before. But entering the option "Windows 7 loader" will take you to windows. Otherwise you will be redirected to Ubuntu.


Note : Don't lose patience and don't get tensed. It works fine.Let me know through your comments if the problem is not cleared.

If you enjoyed this post, make sure you subscribe to my RSS feed!