Wednesday, April 27, 2016

Django | auth_user.last_login ERROR

When tried to create super user using the command python manage.py createsuperuser,
it takes all the inputs correctly but throws below error at last.

ERROR: Django.db.utils.IntegrityError: NOT NULL constraint failed: auth_user.last_login


SOLUTION: 

  1. python manage.py makemigrations
  2. python manage.py migrate


If you enjoyed this post, make sure you subscribe to my RSS feed! Comments are encouraged

Sunday, April 24, 2016

Django | Template extending

[ Article Copied from here. ]


It means that you can use the same parts of your HTML for different pages of your website.

Templates help when you want to use the same information/layout in more than one place. You don't have to repeat yourself in every file. And if you want to change something, you don't have to do it in every template, just once!

Create base template


A base template is the most basic template that you extend on every page of your website.

Let's create a base.html file in AppName/templates/AppName/:

AppName
└───templates
               └───AppName
                          └─── base.html
                          └─── homepage.html

Create base.html with following content:

{% load staticfiles %}

<html>

<head>
    <title>BCR Activity</title>
    <link rel="stylesheet" href="//maxcdn.bootstrapcdn.com/bootstrap/3.2.0/css/bootstrap.min.css">
    <link rel="stylesheet" href="//maxcdn.bootstrapcdn.com/bootstrap/3.2.0/css/bootstrap-theme.min.css">
    <link href='//fonts.googleapis.com/css?family=Lobster&subset=latin,latin-ext' rel='stylesheet' type='text/css'>
    <link rel="stylesheet" href="{% static 'css/Activity.css' %}"
</head>

<body>

    <div class="page-header">
        <h1><a href="/">BCR Activity</a></h1>
    </div>
    <div class="content container">
        <div class="row">
            <div class="col-md-8">
            {% block content %}
            {% endblock %}
            </div>
        </div>
    </div>

</body>

</html>


You might notice this replaced everything in body with:

{% block content %}
{% endblock %}

But why? You just created a block! You used the template tag {% block %} to make an area that will have HTML inserted in it. That HTML will come from another templates that extends this template (base.html). We will show you how to do this in a moment.

Now save base.html, and open your AppName/templates/AppName/homepage.html again. You're going to remove everything above {% for post in posts %} and below {% endfor %}. When you're done the file will look like this:

{% for post in posts %}
    <div class="post">
        <div class="date">
            {{ post.published_date }}
        </div>
        <h1><a href="">{{ post.title }}</a></h1>
        <p>{{ post.text|linebreaks }}</p>
    </div>
{% endfor %}

We want to use this as part of our template for all the content blocks. Time to add block tags to this file!

You want your block tag to match the tag in your base.html file. You also want it to include all the code that belongs in your content blocks.

To do that, put everything between {% block content %} and {% endblock content %}. Like this:


{% block content %}
    {% for post in posts %}
        <div class="post">
            <div class="date">
                {{ post.published_date }}
            </div>
            <h1><a href="">{{ post.title }}</a></h1>
            <p>{{ post.text|linebreaks }}</p>
        </div>
    {% endfor %}
{% endblock %}

Only one thing left. We need to connect these two templates together. This is what extending templates is all about! We'll do this by adding an extends tag to the beginning of the file. Like this:

{% extends 'blog/base.html' %}

{% block content %}
    {% for post in posts %}
        <div class="post">
            <div class="date">
                {{ post.published_date }}
            </div>
            <h1><a href="">{{ post.title }}</a></h1>
            <p>{{ post.text|linebreaks }}</p>
        </div>
    {% endfor %}
{% endblock %}

That's it! Check if your website is still working properly :)

If you have an error TemplateDoesNotExist that says that there is no base.html file and you have runserver running in the console, try to stop it (by pressing Ctrl+C - Control and C buttons together) and restart it by running a python manage.py runserver command.


If you enjoyed this post, make sure you subscribe to my RSS feed! Comments are encouraged

Django | Create URLs | Create Views | Create Templates

1. Create URLs

We want 'http://127.0.0.1:8000/' to be a homepage of our Application and display custom design / content.

We also want to keep the AppName/urls.py file clean, so we will import urls from our application to the main ProjectName/urls.py file.

Go ahead, add a line that will import AppName.urls into the main url (''). Note that we are using the include function here so you will need to add that to the import on the first line of the file.

Your ProjectName/urls.py file should now look like this:

from django.conf.urls import include, url
from django.contrib import admin

urlpatterns = [
    url(r'^admin/', admin.site.urls),
    url(r'', include('AppName.urls')),
]

Django will now redirect everything that comes into 'http://127.0.0.1:8000/' to AppName.urls and look for further instructions there.

If we use     url(r'^abcd/$', include('AppName.urls')), in above code, then http://127.0.0.1:8000/ will be unchanged and http://127.0.0.1:8000/abcd/ will be redirected to AppName.urls

When writing regular expressions in Python it is always done with r in front of the string. This is a helpful hint for Python that the string may contain special characters that are not meant for Python itself, but for the regular expression instead.

Alright ! We redirected the homepage to AppName.urls. Now we need to write something in AppName/urls.py file to show some content in that page.

Create a new AppName/urls.py empty file and add these two first lines:

from django.conf.urls import url
from . import views

Here we're importing Django's function url and all of our views from our application (we don't have any yet, but we will get to that in a minute!)

After that, we can add our first URL pattern:

urlpatterns = [
    url(r'^$', views.activities_list, name='activities_list'),
]

As you can see, we're now assigning a view called post_list to ^$ URL. This regular expression will match ^ (a beginning) followed by $ (an end) - so only an empty string will match. That's correct, because in Django URL resolvers, 'http://127.0.0.1:8000/' is not a part of the URL. This pattern will tell Django that views.activities_list is the right place to go if someone enters your website at the 'http://127.0.0.1:8000/' address.

The last part name='activities_list' is the name of the URL that will be used to identify the view. This can be the same as the name of the view but it can also be something completely different.

If you try to visit http://127.0.0.1:8000/ now, then you'll find some sort of 'web page not available' message. This is because the server (remember typing runserver?) is no longer running. Take a look at your server console window to find out why.


It's telling you that there is no attribute 'activities_list'. That's the name of the view that Django is trying to find and use, but we haven't created it yet.


2. Create Views

A view is a place where we put the "logic" of our application. It will request information from the model you created before and pass it to a template.

Views are placed in the views.py file. We will add our views to the AppName/views.py file.


OK, let's open up this file and see what's in there:

from django.shortcuts import render

# Create your views here.

Not too much stuff here yet.


The simplest view can look like this.

def activities_list(request):
    return render(request, 'AppName/homepage.html', {})

As you can see, we created a function (def) called post_list that takes request and return a function render that will render (put together) our template AppName/homepage.html.

Save the file, go to http://127.0.0.1:8000/ and see what we have got.

Another error! Read what's going on now:


To fix the above error, we need to make sure that homepage.html actually exists. (We've mentioned it in above view)

3. Create Templates

Templates are saved in AppName/templates/AppName directory. So first create a directory called templates inside your AppName directory. Then create another directory called AppName inside your templates directory:

AppName
└───templates
    └───AppName

(You might wonder why we need two directories both called AppName - this is simply a useful naming convention that makes life easier when things start to get more complicated.)

And now create a homepage.html file (just leave it blank for now) inside the AppName/templates/AppName directory.

See how your website looks now: http://127.0.0.1:8000/

If you still have an error TemplateDoesNotExist, try to restart your server. Go into command line, stop the server by pressing Ctrl+C (Control and C buttons together) and start it again by running a 

python manage.py runserver command.


All the content you create in hompage.html will be displayed in our http://127.0.0.1:8000/ page from now.


The actual use of templates is not this. Template means a basic strcucture that should be reusable or extendable. For this functionality, please check my next post.


If you enjoyed this post, make sure you subscribe to my RSS feed! Comments are encouraged

Django | Create simple Website and App

1. Install Django


  • Download the official release.  (pip install is a good choice)
  • Once all the files finish downloading, we need to make sure our local Python installation is aware that Django exists on our machine. There are a couple ways to go about that, but a symbolic link to your Python site packages directory is probably the easiest.
  • Assuming you’re on a *nix system, this line will do the trick:

ln -s /home/username/.local/lib/python2.7/site-packages/django  /usr/lib/python2.7/dist-packages/django


  • If you don’t know where your Python site directory is, here’s a handy bit of Python that will tell you:

python -c "from distutils.sysconfig import get_python_lib; print get_python_lib()"


  • If you’re on Windows, the easiest thing to do is add Django to your PythonPath environment variable. On Windows, you can define environment variables in the Control Panel. 
  • Django installation docs suggest creating a symbolic link to the file /home/username/.local/lib/python2.7/site-packages/django/bin/django-admin.py in a directory on your system path, such as /usr/local/bin.  Just paste this code in your shell.

ln -s /home/username/.local/lib/python2.7/site-packages/django/bin/django-admin.py /usr/local/bin


  • Now that Django is installed and Python knows where it lives, we’re ready to get started.


2. Set up your first project


OK, let’s get started. From the command line, switch to your web development directory. Something like this:

cd ~/sites/dev

Now we’re going to run the django-admin tool we mentioned earlier. If you created the symlink, you don’t need the full path, but if you didn’t or if it doesn't work, here’s the code:

python /home/username/.local/lib/python2.7/site-packages/django/bin/django-admin.py startproject ProjectName


Now cd over to the new folder:

cd ~/sites/dev/ProjectName

This is going to be our project folder into which we will add various apps.

  • django-admin.py is a script that will create the directories and files for you. You should now have a directory structure which looks like this:


ProjectName
├───manage.py
└───ProjectName
                |__ settings.py
                |__ urls.py
                |__ wsgi.py
                |__ __init__.py

3. Changing settings

The next step is to fill out our project settings file. Fire up your favorite text editor and open up the settings.py file inside the “ProjectName/ProjectName” directory.

There's a lot of different database software that can store data for your site. We'll use the default one, sqlite3.

This is already set up in this part of your ProjectName/settings.py file:

DATABASES = {
    'default': {
        'ENGINE': 'django.db.backends.sqlite3',
        'NAME': os.path.join(BASE_DIR, 'db.sqlite3'),
    }
}

To create a database for our site / app, let's run the following in the console:

python manage.py migrate

(we need to be in the ProjectName directory that contains the manage.py file). If that goes well, you should see something like this:

(myvenv) ~/ProjectName$ python manage.py migrate
Operations to perform:
  Apply all migrations: auth, admin, contenttypes, sessions
Running migrations:
  Rendering model states... DONE
  Applying contenttypes.0001_initial... OK
  Applying auth.0001_initial... OK
  Applying admin.0001_initial... OK
  Applying admin.0002_logentry_remove_auto_add... OK
  Applying contenttypes.0002_remove_content_type_name... OK
  Applying auth.0002_alter_permission_name_max_length... OK
  Applying auth.0003_alter_user_email_max_length... OK
  Applying auth.0004_alter_user_username_opts... OK
  Applying auth.0005_alter_user_last_login_null... OK
  Applying auth.0006_require_contenttypes_0002... OK
  Applying auth.0007_alter_validators_add_error_messages... OK
  Applying sessions.0001_initial... OK

The other settings are well documented in the settings.py file and we can skip over most of them for now. 

And we're done! Time to start the web server and see if our website is working!

You need to be in the directory that contains the manage.py file (the ProjectName directory). In the console, we can start the web server by running

python manage.py runserver:


If you are on Windows and this fails with UnicodeDecodeError, use this command instead:

(myvenv) ~/ProjectName$ python manage.py runserver 0:8000

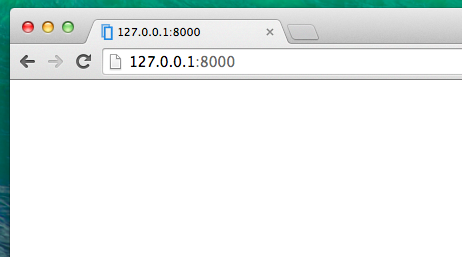
Now all you need to do is check that your website is running. Open your browser (Firefox, Chrome, Safari, Internet Explorer or whatever you use) and enter the address:

http://127.0.0.1:8000/

The web server will take over your command prompt until you stop it. To stop the web server, switch back to the window in which it's running and pressing CTRL+C - Control and C buttons together (on Windows, you might have to press Ctrl+Break).

Congratulations! You've just created your first website and run it using a web server!


One more thing before we finish with settings.py, here’s a handy trick for the template directories. I generally keep all my templates in a folder named “templates” within my project folder (in this case, “ProjectName”). But I generally move between development and live servers quite a bit and I hate having to change the path to the templates folder. This trick takes care of that:

import os.path

TEMPLATE_DIRS = (

os.path.join(os.path.dirname(__file__), 'templates'),

)

Instead of hard coding the path to our templates folder this is dynamic — and it showcases how easy it is to tweak Django using Python. We just import the os.path Python module and then find the path to the directory where settings.py is and then appends ‘templates’ to that path.

Now when we push the site live, there’s no need to change the settings.py file.

4. Creating an application


$ python manage.py startapp AppName

You will notice that a new blog directory is created and it contains a number of files now. Our directories and files in our project should look like this:

djangogirls
├── blog
│       ├── __init__.py
│       ├── admin.py
│       ├── apps.py
│       ├── migrations
│       │       └── __init__.py
│       ├── models.py
│       ├── tests.py
│       └── views.py
├── db.sqlite3
├── manage.py
└── mysite
        ├── __init__.py
        ├── settings.py
        ├── urls.py
        └── wsgi.py


After creating an application we also need to tell Django that it should use it. We do that in the file ProjectName/settings.py. We need to find INSTALLED_APPS and add a line containing 'AppName'. So the final product should look like this:

INSTALLED_APPS = (
    'django.contrib.admin',
    'django.contrib.auth',
    'django.contrib.contenttypes',
    'django.contrib.sessions',
    'django.contrib.messages',
    'django.contrib.staticfiles',
    'AppName',
)

In the AppName/models.py file we define all objects called Models - this is a place in which we will define our contents.

For Example, if we want to create blog posts, let's open AppName/models.py, remove everything from it and write code like this.

from django.db import models
from django.utils import timezone


class ObjectName(models.Model):
    author = models.ForeignKey('auth.User')
    title = models.CharField(max_length=200)
    text = models.TextField()
    created_date = models.DateTimeField(
            default=timezone.now)
    published_date = models.DateTimeField(
            blank=True, null=True)

    def publish(self):
        self.published_date = timezone.now()
        self.save()

    def __str__(self):
        return self.title

Double-check that you use two underscore characters (_) on each side of str. This convention is used frequently in Python and sometimes we also call them "dunder" (short for "double-underscore").

Let’s step through the code line by line and we’ll talk about what’s going on.

class ObjectName(models.Model): - this line defines our model (it is an object).

class is a special keyword that indicates that we are defining an object.
ObjectName is the name of our model. We can give it a different name (but we must avoid special characters and whitespaces). Always start a class name with an uppercase letter.
models.Model means that the ObjectName is a Django Model, so Django knows that it should be saved in the database.

5. Create tables for models in your database


The last step here is to add our new model to our database. First we have to make Django know that we have some changes in our model (we have just created it!). Go to your console window and type 

python manage.py makemigrations AppName

It will look like this:

(myvenv) ~/ProjectName$ python manage.py makemigrations AppName
Migrations for 'AppName':
  0001_initial.py:
  - Create model Post

Django prepared for us a migration file that we have to apply now to our database. 
Type python manage.py migrate AppName and the output should be:

(myvenv) ~/ProjectName$ python manage.py migrate AppName

Operations to perform:
  Apply all migrations: blog
Running migrations:
  Rendering model states... DONE
  Applying blog.0001_initial... OK

Hurray! Our model is now in our database! 


6. Django admin


To add, edit and delete posts we've just modeled, we will use Django admin.

Let's open the AppName/admin.py file and replace its content with this:

from django.contrib import admin
from .models import ObjectName

admin.site.register(ObjectName)

As you can see, we import (include) the Object model defined in the previous chapter. To make our model visible on the admin page, we need to register the model with admin.site.register(ObjectName).

OK, time to look at our Object model. Remember to run python manage.py runserver in the console to run the web server. Go to the browser and type the address http://127.0.0.1:8000/admin/ You will see a login page like this:


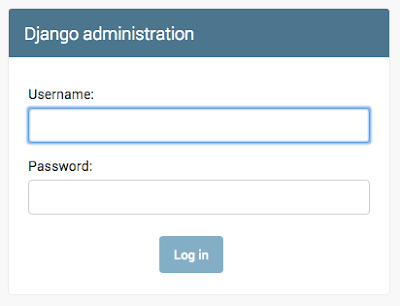
To log in, you need to create a superuser - a user which has control over everything on the site. Go back to the command-line and type python manage.py createsuperuser, and press enter. When prompted, type your username (lowercase, no spaces), email address, and password.


(myvenv) ~/ProjectName$ python manage.py createsuperuser
Username: admin
Email address: admin@admin.com
Password:
Password (again):
Superuser created successfully.

Return to your browser. Log in with the superuser's credentials you chose; you should see the Django admin dashboard.


Saturday, April 23, 2016

Django | __init__() got an unexpected keyword argument 'maxlength'

TypeError: __init__() got an unexpected keyword argument 'maxlength'

This problem arises when you are using a newer version of Django. Since 1.0 (or actually, somewhere in 0.97) Django switched to max_length instead of maxlength.

So, replace maxlength with max_length


If you enjoyed this post, make sure you subscribe to my RSS feed! Comments are encouraged

Django default Admin Username and Password


In earlier versions of Django, when syncdb command is run, it used to ask for super user creation. But the latest versions are not using syncdb command. Here is an article related to it.

We need to create admin user after using python manage.py migrate command. I have checked and found that there are no default users created automatically.


  1. $ python manage.py createsuperuser
  2. Enter your desired username and press enter.
    • Username: admin
  3. You will then be prompted for your desired email address:
    • Email address: admin@example.com
  4. The final step is to enter your password. You will be asked to enter your password twice, the second time as a confirmation of the first.
    • Password: **********
    • Password (again): *********

Superuser created successfully.


If you enjoyed this post, make sure you subscribe to my RSS feed! Comments are encouraged

Django | DoesNotExist at /admin/login/ Site matching query does not exist

When typed  http://127.0.0.1:8000/admin/ into browser's address bar, I've encountered the following error.


I found that this is due to incorrect configuration inside settings.py file.

You don't really need the sites framework if you only run one site from the project, so the easiest fix would be to remove the following item from your INSTALLED_APPS and the error should go away:

'django.contrib.sites' ( It is a good practice to comment it and not to delete it )


If you enjoyed this post, make sure you subscribe to my RSS feed! Comments are encouraged

AttributeError: 'AdminSite' object has no attribute 'root' | Django

Your url for admin should be:
url(r'^admin/', admin.site.urls)

This would be available by default in urls.py file unless you or some program change it.


It should not  be
(r'^admin/(.*)', admin.site.root)

This is a change implemented in latest versions of Django.


If you enjoyed this post, make sure you subscribe to my RSS feed! Comments are encouraged

Unknown command: 'syncdb' in Python | Django


If you try to use python manage.py syncdb in latest version of Django, it throws the following error.

Unknown command: 'syncdb'
Type 'manage.py help' for usage.

You won't find any syncdb command in help too. This is because syncdb command is deprecated in Django 1.7.

Use  python manage.py migrate instead.


If you enjoyed this post, make sure you subscribe to my RSS feed! Comments are encouraged

Add to PYTHONPATH


If you're using bash (on a Mac or GNU/Linux distro), add this to your ~/.bashrc

export PYTHONPATH=$PYTHONPATH:/my/other/path

Make sure the directory you point to has at the topmost init.py file in your directory structure.


For example, I tried export PYTHONPATH=$PYTHONPATH:/Users/joey/repos but it did not work because my repos directory did not have _init_.py

Going down one directory further: /Users/joey/repos/specificRepo did the trick. Now python can traverse any downward directory connected to the specificRepo directory that contains a init.py !


If you enjoyed this post, make sure you subscribe to my RSS feed! Comments are encouraged

Monday, April 4, 2016

Connectify for Ubuntu | Works for Android

The pre-installed Network Manager in Unity does not support Access Point (AP) mode which is required for Android devices. Fortunately, KDE’s connection editor support this mode.

Below is how to do it yourself:

1. Click the link below to bring up Ubuntu Software Center and install kde-nm-connection-editor:

2. Once installed, press Alt+F2 and run command to launch the app:
kde-nm-connection-editor

3. Click Add button and choose “Wireless (shared)” from the drop-down list.
4. Type in a name, ssid, and select Access Point mode. If want, set up a password under Wireless Security tab. Finally, click OK.
5. Click Network Manager applet on Unity panel and then choose “Connect to Hidden Wi-Fi network”, choose the connection you created in previous step and click Connect button.

Turn on WLAN on your Android phone and you’ll see the access point in the list. Click connect and enjoy!


If you enjoyed this post, make sure you subscribe to my RSS feed! Comments are encouraged

Source