Showing posts with label Operating system. Show all posts

Thursday, September 19, 2013

Virtual Box doesn't accept 64 bit OS

When I tried to install BackTrack 5(64 bit) on my Ubuntu machine (32 Bit), it just thrown an error message as shown below.

Error message : VT-x/AMD-V hardware acceleration has been enabled, but is not operational. Your 64-bit guest will fail to detect a 64-bit CPU and will not be able to boot.Please ensure that you have enabled VT-x/AMD-V properly in the BIOS of your host computer.

I found 2 types of solutions and applied both of them on laptop. Now it just works fine. They are explained in steps below.

Step 1 : Shutdown the PC(not Restart)
Step 2 : Turn on the PC and goto bios settings
Step 3 : Mine is Lenovo with Intel technology. It has Intel Virtual Technology option in configuration menu (For some PCs .. this will be under advanced settings)
Step 4 : Enable it (Its for enhancing the support to software based virtualisation solutions)
Step 5 : Save and Exit of bios
Step 6 : Continue with your installation of guest OS in virtual box.


If you enjoyed this post, make sure you subscribe to my RSS feed! Comments are encouraged
Thursday, September 8, 2011

Solution for : Windows7 / Ubuntu 11.04 option missing from the boot menu


Today, I've done a mistake while installing my Ubuntu 11.04 alongside windows.
After selecting the partitions and assigning /boot, swap and / we need to choose where to install the grub boot loader. By default, the boot loader should be installed in the 1st partition of the first hard disk i.e., (hd0,0). I have windows7 already installed on my system. So, there is one more option named windows 7 loader. Due to lack of knowledge, I thought that default boot loader will be replaced by the new Grub loader and selected it. What happened is, I have both windows and ubuntu safely residing on different partitions of my hard disk. But not able to boot into windows7. In the Grub that appears at system startup, we need to choose an option named windows7 loader in order to get into windows box. But entering this option yielded with the result of same boot menu again and again. Then I understood my mistake. I have replaced the windows boot loader with the grub loader. This is my mistake. So, I entered my ubuntu, connected internet and then googled for the solution. After much work and many trails, I did the following procedure.

  1. Reboot and enter the option named "windows 7 recovery loader" which appears in the boot menu of grub. This takes you to a command prompt(windows).
  2. Type "bootrec /FixBoot" and press Enter
  3. If it doesn't work then type "bootrec /RebuildBcd" or
  4. "bootrec /FixMbr" (all commands without quotes).
  5. If it worked, no message will be displayed. But in case of error, the error message will be displayed.
  6. Try following the above order.
  7. Reboot. You will enter into Windows without asking for boot menu. Don't panic. Your ubuntu is still safe.
  8. Now put your ubuntu CD and delete the partitions given for /boot,swap,/ . 
  9. Make them again as usual and reinstall the ubuntu without touching bootloader installation area. (Leave it as it is. It gets installed into /dev/sda. And reinstalling doesn't delete your files in ubuntu).
  10. After installtion, you will be back with your bookmarks, personal folders etc,.
  11. Reboot to check for dual boot menu.
  12. Now, grub is same as before. But entering the option "Windows 7 loader" will take you to windows. Otherwise you will be redirected to Ubuntu.


Note : Don't lose patience and don't get tensed. It works fine.Let me know through your comments if the problem is not cleared.

If you enjoyed this post, make sure you subscribe to my RSS feed! 

Tuesday, February 8, 2011

How to check and enable IPV6 in Windows XP

As IPV6 is activated officially by IETF, many are in need of it. In windows 7 it is already enabled. However, due to some circumstances, it may be disabled. Also due to the failure of Windows Vista, many people stuck to Windows Xp till now. Especially in case of educational institutions, firms etc., where a large number of computers are present, are still in dilemma whether to shift to Windows 7. So if these users wanna activate IPV6, there is some procedure here.

1) Just goto run by pressing windows button + R.
2) Type cmd to enter command prompt.
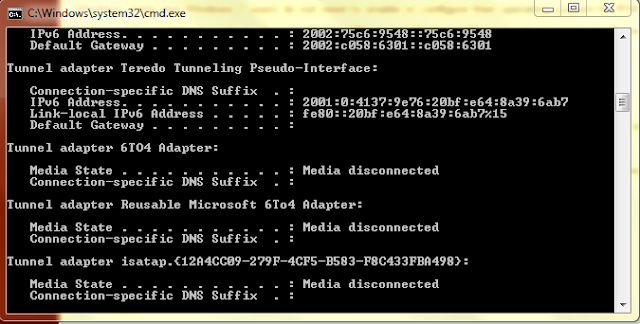
3) Type ipconfig and check for the entry IPV6.


4) If not found then type netsh and press enter.
5) Now type interface and press enter.
6) Type ipv6 and press enter.
7) Type install and press enter.

I think there is another way to do it. But i prefer this as it is easy.
If anyone want to know how to do it using GUI and not from command prompt, just leave a comment here. Also if there is any problem with IPV6 installation let me know through your comments.

Sunday, January 16, 2011

Ubuntu Shortcuts

Alt + f1 Open main menu.Use up/down/right/left arrow keys to select in Applications/Places/System.
Alt + f2 Run Application.This will bring up a window,type command to run an application.
Print Screen Make a screenshot of whole screen.
Alt + Print Screen Make a screenshot of current window.
Window Shortcuts :
Alt + f4 Close the current window.
Alt + f5 Returns window to 'normal' or previous size.
Alt + f7 Moves the current window
Alt + f8 Resizes current window
Ctrl + Alt + Del This will minimize all windows and apps,and bring you to desktop.
Alt + f9 Minimize the current window.
Alt + f10 Maximize the current window.
Alt + Tab Switch in windows.
System Shortcuts :
Ctrl + Alt + Delete Restart the computer immediately, without saving open files.
Ctrl + Alt + Backspace Restart X Windows
Ctrl + Alt + Plus Rotate through supported screen resolutions
Ctrl + Alt + Minus Rotate backwards through supported screen resolutions
Ctrl + Alt + F1---F5 Open Virtual Terminal
Ctrl + Alt + F7 Return to Graphics screen from Virtual Terminal

Sunday, January 9, 2011

Windows Media Player Plus

Windows Media Player Plus is a third party plugin for Microsoft’s Windows Media Player. It adds a series of features to the media player, more precisely to Windows Media Player 12 and 11.

The plugin adds several useful features to Windows Media Player including a more comfortable tag editor that can be accessed by right-clicking songs in the player’s interface.

Windows Media Player Plus! includes the following enhancements:

  • Tag Editor Plus : An alternative for Windows Media Player's Advanced Tag Editor. Tag Editor Plus works on Windows Media Player 12 too, where the original Advanced Tag Editor has been removed.
  • Real 'find as you type' in the library: you can simply start typing to search, without having to click on the Search field first.
  • Access the standard Explorer right-click menu of a media file directly from within Windows Media Player.
  • Restore last active playlist, media item, and playback position at Windows Media Player startup.
  • Show currently playing media in Windows Media Player's title bar.
  • Disable group headers in the Library Pane.
  • Enhanced and configurable replacement of the Windows Live Messenger Music plug-in .
  • Access the properties/settings of any Windows Media Player plug-in from within the main menu (Tools - Plug-in properties), without having to go to Options first.
  • Quickly re-enable all plug-ins after a Windows Media Player crash .


Windows Media Player Plus! is written for Windows Media Player 11 or higher.
This can be downloaded from here or from the developer's link.


Enhanced by Zemanta